Touch switches: types, device, circuits. Modern touch switches How to connect a touch switch
The development of technology has affected all areas of human life, including home improvement. One example is a touch-sensitive light switch. This device significantly increases the comfort of being in the room and allows you to control the lighting by touch. And this is not the only advantage.
Design features and operating principle
The touch switch operates even when you lightly touch the button. Consists of three main elements:
- Control block. The system processes the external signal and transmits it to the necessary parts.
- Switching device. Gives a load to the electrical network, which opens and closes the circuit and changes the current to the lamp.
- Touch (control) panel. Designed to sense touches or signals from the remote control remote control. In modern devices you don’t have to touch the sensor, just move your hand nearby.

Standard models of switches are equipped with the following capabilities:
- Turn on/off the light, adjust the brightness.
- Monitor the operation of heating equipment and report temperature changes.
- Open/close blinds.
- Turn on/off household appliances connected to the switch.
Among the additional functions, the motion sensor is very useful.
Classification system
There are touch switches different types, which are selected depending on the needs of a residential building or office.
With remote control
Used in such cases:
- the switch is located in an inconvenient place and cannot be moved from there;
- a person with limited mobility lives in the apartment/house;
- switches are located at a height where children cannot reach;
- there is a need to change the brightness of the light without getting out of bed.

To work with a design of this type, it is not necessary to use a special remote control. A universal one is suitable, connecting simultaneously to two, three or more devices.
With timer
The device has many advantages:
- Quiet operation.
- Easy to install.
- Safety. If the circuit is broken or shorted, the switch automatically moves to the off position.
- Attractive appearance. The device body can be painted in any color.
- Two colors to indicate operation. Red indicates the backlight is on, blue indicates it is off.
- Durability and reliability. Special glass is used to make products. The edges are carefully sanded. This makes the switch safe and easy to clean.
- Versatility. Works with any type of lamp, be it LED, halogen or incandescent.
Touch switches with timers are distinguished by a wide range of functions and are economical.

Optical-acoustic switches
They react to sound or movement - clap, a spoken word or some kind of gesture. The main thing is that all this happens within the range of the sensor.
What are dimmers
Touch switches with a dimmer allow you to change the level of lighting in the room. Conventional devices operate in two modes - on/off. The dimmer allows you to adjust the brightness of the light to your taste.
Devices with such a device have important advantages:
- Thanks to the ability to change brightness, they help reduce the amount of electricity consumed. The indicator decreases by 50%.
- Allows you to adjust the lighting to suit the situation. For example, in the evening after a busy day at work, you can reduce the brightness to twilight.
- If there are several switches in the room, using a dimmer you can focus attention on one part of the interior.

Designs with dimmers do not work with energy-saving and fluorescent lamps.
Devices for mounting LED lighting
Switches that can be connected to LED strips are also called dimmers. They turn on, turn off and adjust the brightness of the light source.
Most often, such devices are part of an entrance lighting scheme or a smart home system, and also focus attention on some detail of the room.
Advantages
Touch switches, compared to classic devices, have many advantages:
- can work with any light sources and electrical appliances;
- allow you to save energy;
- are distinguished by reliability and long service life;
- perform many functions;
- devices are easy to install;
- operate almost silently;
- safe for humans;
- the sensor is triggered even when it is touched with wet hands.

Several switching systems can be installed in one device.
How not to make a mistake with your choice
When choosing a touch switch, you first need to look at the maximum and minimum current and voltage. Usually the values are indicated on the packaging or the device itself. If they differ greatly from the network characteristics, you will have to install a stabilizer.
It is also worth remembering other parameters:
- number of devices connected to one switch;
- need for a dimmer;
- Is there a need for a timer? automatic mode turns on/off lights or appliances;
- Operating principle: by touch or remote control.
When the set of functions and properties is defined, you can move on to external characteristics. For example, decide in advance whether the switch will have a glass or plastic control panel.
Manufacturers of touch switches
The manufacturer of the switch is an important factor determining its choice. Experts recommend giving preference to those that have a good reputation in this field:
- Basalte. Produces premium products. They have an unusual design and high quality. On the front panel, which is often made of glass, there are indicators that act as a backlight. The company also produces switches that can be integrated into a smart home system. The price of products depends on the complexity of their execution.
- Legrand. A French company producing a wide range of electrical products. The switches it produces are endowed with a large number of functions. They belong to the expensive price segment.
- Livolo. A Russian company that has appeared on the electrical engineering market quite recently. A distinctive feature of the products it produces touch switches is their affordable price.

Subtleties of connection
Installing a touch switch is no different from installing a conventional device. It takes place in several stages:
- turn off the electricity;
- remove the old switch;
- remove the top panel from the new product;
- connect the wires to the terminals intended for them;
- place the operating mechanism of the switch in the installation box;
- secure the device using spacers and special screws;
- fix the panel.
The connection of the two-key model is carried out according to the same scheme. To avoid confusion, it is recommended to use cables that have multi-colored cores.
Pass-through switches are connected in the same way. They allow you to control a light source or equipment from different places. This is convenient if there is a long corridor in the apartment/house.
There is an option for unusual installation - not on the wall, but in the mirror. In this case, the switch must consist of a control unit and an infrared sensor. It is triggered not by touch, but by movement.
How to make a touch sensor with your own hands
You can construct a sensor for a touch switch yourself. To do this you need to prepare:
- relay with voltage 6–12 V;
- part of the foil PCB, which will play the role of a sensor;
- pulse diode with a voltage of 100 V.

Touching the sensor provokes the opening of elements designated in the diagram as VT1 and VT2. After this, the circuit will close (using a relay), and the lamp/electrical appliance will turn on.
You can also make a device with an infrared sensor yourself. It only works when there is movement within the sensor's visibility range. If it is absent, the lighting will turn off after a certain period of time.
The connection occurs according to the following diagram:

This scheme has important features:
- the output is one;
- transistor is open;
- the contacts from the relay must be connected to the key;
- The infrared sensor operates thanks to a pulse generator;
- to increase the strength of the pulse current that goes to the infrared LED, it is necessary to install amplifiers.
The connection is made so that after 20 minutes after a person leaves the room, the light turns off.
The sensor-based device is a good alternative to conventional switches. It is attractive appearance, efficiency, reliability. Allows you to turn on/off not only light sources, but also household appliances. Products of this type can be purchased at a specialized store or, if you have the necessary skills and abilities, you can make them yourself.
With the development of technology, the turn came to the usual household light switch, which was transformed into a touch switch. The touch switch is electronic device, assembled on the basis of semiconductor elements or a microcircuit that provides switching on or off of a consumer, most often lighting, without mechanical impact on the key. It is triggered by a light touch on the sensitive element.
Operating principle
 Any touch switch is, in principle, a sensor that reacts even to a very slight touch. As you know, the human body has a very low electrical charge, which is enough to trigger this switch.
The touch switch consists of:
- An element with high sensitivity that reacts to the approach of the human body or to its touch to the sensor;
- Signal amplifier assembled on semiconductors and microcircuits;
- A switching device for switching on a load, it can be a miniature relay or a thyristor. Of course, the operation of a device using a thyristor is more reliable, since there is no contact part, which can burn or oxidize over time.
How to make a touch switch yourself
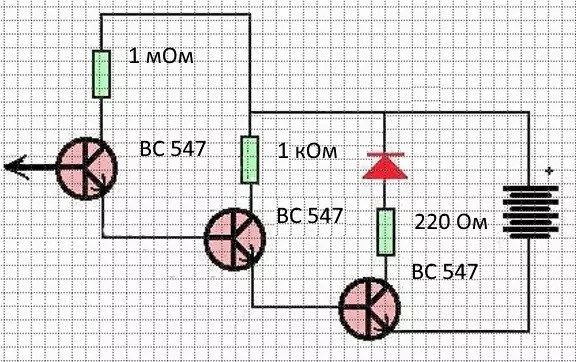
The circuit is powered from a source DC voltage, the value of which is up to 16 Volts. At the output of the third transistor, an LED is turned on, which is indicated by a red light; it is the load. For the first transistor to open, just touch its base with your hand. Instead of an LED, you can connect a relay with a low operating current and then it becomes possible to turn on and off a more significant load. Lamps cannot be connected directly to the circuit instead of an LED, since any of them has a lot of power. Copper foil can serve as a sensor, and the second and third stages are simply a weak signal amplifier.
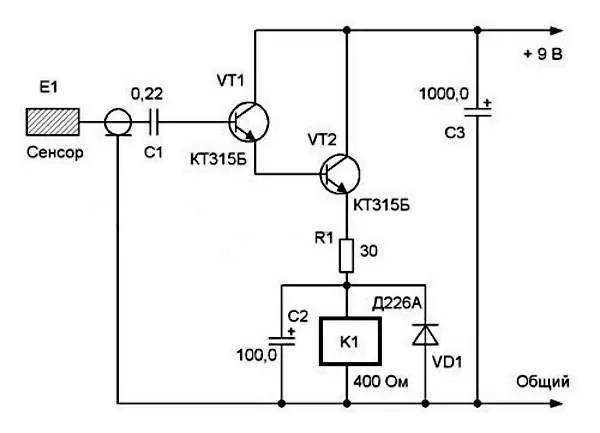
The main operating and switching element, which directly includes the lamp, lamp or sconce, is relay K1. It can be of the RES 55A or RES 55B type with an operating current of about 15–20 mA. Diode VD1 acts as protection against voltage surges when the relay is activated, and capacitor C2 smoothes out the ripples that occur. It is better to use resistor R1 of variable design for reliable operation of the relay. Within the range of up to 50–60 Ohms. The sensor can be a small piece of foil PCB or copper plate. It is highly sensitive, so if the sensor is installed at a distance from the circuitry on the board, the wire must be protected from interference by shielding. Any source can be used as a power source direct current, battery or accumulator. It must be remembered when installing semiconductor parts that overheating must be reduced to a minimum. Lamps that will be turned on using power relay contacts should be chosen with minimal power consumption:
- LED bulbs;
- Economical fluorescent lamps.
Making more complex circuits with your own hands without special skills will be quite problematic, but it is still possible, and here is one of them. 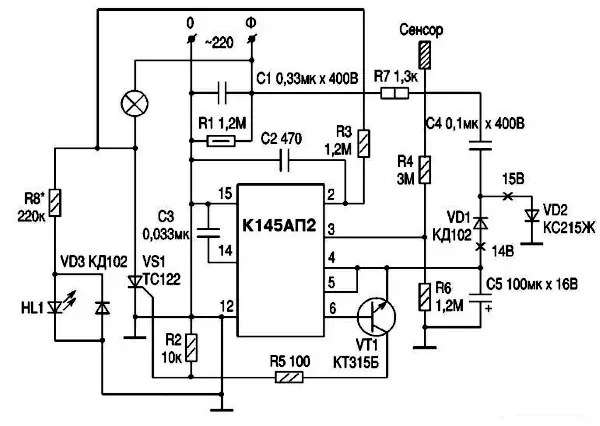
Whether to make it yourself or buy a ready-made product is up to the person who decides to install this switching device.
Advantages of a touch switch
After experience in operating touch switches, the following main advantages can be identified:
- Absence of even the slightest noise;
- Large selection and stylish models;
- The presence of galvanic isolation, which means complete security a person operating lighting or electrical appliances;
- The ability to touch the sensor even with damp or wet hands;
- No mechanical breakdowns, which means reliability throughout the entire long service life;
- Creation of several switching systems in one device.
Application and installation of touch switches
 Most often, they are used in domestic conditions to turn on lighting fixtures, for a table lamp, for sconces. That is, in production in difficult conditions, their use is not so widespread. The touch switch for the LED strip can also be made with a dimmer installed, with the help of which the brightness of the emitted light flux is smoothly or stepwise adjusted. It is installed directly in the lamp under its glass or other transparent element. With one short touch, the light source turns on, and when you hold your finger on the sensor, the brightness changes. In this case, it is recommended to highlight the location of the switch with an LED.
If the room has a long corridor or tunnel, then turning on the same lamp with a switch located at the beginning and end of it will not work; a pass-through touch switch is designed for this. It is connected according to a special circuit.
To do this, both switches must be pass-through. Both mechanical switching devices and touch ones should be selected in accordance with the power of the electrical appliances to be switched on. 
Another unique example of connecting and installing a sensor is mounting it in a mirror. The touch switch for the mirror is mounted behind the reflective surface and is activated even without touching, but only when you move your hand near the active sensitive element. This gives a wild flight of imagination for design ideas. The touch switch for the mirror consists of an electronic unit and an infrared sensor. When you move your hand again near the sensor, the load is turned off.
Wireless touch switches
 The sensor-controlled wireless switch is a similar radio-controlled and infrared model of a conventional mechanical switch. They consist of a transmitter mounted in a switch housing and a receiver, which directly turns on the electrical appliance and is installed in close proximity to it. Some of them additionally have a built-in dimmer to adjust the brightness of the lighting, which is a very convenient feature. One of the varieties of touch wireless switches also has a remote control at its disposal. The range of the device depends on the model; for those controlled by a radio signal, it is much longer.
For a person unfamiliar with electricity and its dangers, I would like to remind you that all work performed with switches equipped with a sensor or mechanics should be carried out with complete shutdown nutrition. It is also worth taking care that someone does not turn on the power supply during installation and installation of the device; for this you need to ensure reliable protection switchboard with a key. Even if low-voltage wireless touch switches are installed. Safety should always be a priority when performing any work, especially with electricity, which has no smell, no sound, and cannot be seen by the human eye.
In order for the device to meet the owner’s expectations in the future, you need to choose it correctly. To do this you need to consider:
How many light sources will be connected to the switch.
Consider the temperature and amount of moisture in the room.
Will there be any other devices connected to the switch, for example, a temperature sensor?
Types of touch switches
There are many types of touch switches. More details about each:

A dimmer can be installed on each of these types of touch switches. It allows you to adjust the intensity of lighting in the room, which also saves energy.
The touch switch consists of three main parts. Its structure does not depend on its type. The first part is the decorative face plate. She reacts to touch, to the approach of fingers.
The second part is a sensor, the type of which depends on the type of switch. It is responsible for transmitting information from the face plate, which receives the signal, to the third part. The third switching part. It converts the signal into an electrical one.

Installation of touch switches
Essentially, connecting circuit breaker is no different from a regular keyboard; you can install the touch switch with your own hands without much effort. This process can be studied in the article:.
The household light switch has been constantly modernized over the many years of its existence. A new stage in the production of switches was the use of touch control technologies. Anyone who has ever used a mobile phone, tablet or payment terminal is familiar with the feeling of convenience of working with a touch panel.
However, for us, ordinary users, controlling the lighting in our apartments and houses using a touch panel is new. And I think many will be interested in learning how such a switch works and how this miracle of technology works in more detail.
Unlike conventional push-button switches, such switches are equipped with touch and remote control functions. The controls are very simple and work on the touch sensor principle. mobile phone or tablet: touch the panel with your finger, the light comes on, touch it again - it goes out. True, the sensitivity zone of the sensor is limited and you need to touch it in a specially designated place.
Besides the beautiful design and elegant look, I also liked the radio control function. When ordering switches, you need to keep in mind that the remote control may not be included in the kit and will have to be purchased separately. The radio remote control makes it possible to control the switch within a radius of 30 m.
Touch switch device
Honestly, until recently I didn’t even suspect the existence of such interesting control devices lighting fixtures. It all started with a part-time job at one site; it was necessary to complete renovations in a two-room apartment and install new sockets and switches to replace outdated ones. But the customer was not satisfied with the usual electrical installation products. He wanted something unusual, fresh and in the “Hi-tech” style.
When I was surfing the Internet and looking for exclusive options, I came across the Livolo company. This was an excellent option to replace a push-button switch (as the customer put it, “a white toggle switch with a button”). After agreeing with the customer, we decided that he liked this option the most and fits the interior of the room very well. After approval, I ordered the following products: 1) single-key touch light switch VL-C701R, 2) two-key touch light switch VL-C702R and 3) control panel for them VL-RMT-02.
I ordered switches and the control panel for them from trading platform Aliexpress. Their cost at the time of order (December 2016), including delivery, was: single-key – 1372 rubles, two-key – 1670, control panel – 338 rubles. The parcel from China took 24 days.
First, let's unpack the boxes with switches and see in what form they were delivered. Everything came in one common package, since the order was made from one seller. The packaging was a little dented, but all the insides were intact.

Switches VL-C701R and VL-C702R Each is supplied in its own packaging. Touchpad made of tempered glass and packaged in a box separate from the switch. That is, there were four packages in total: two switches and two panels for them. Also included is remote control lighting VL-RMT-02. I would also like to note that the manufacturer offers a wide range of colors of touch panels that will suit any apartment design. I liked the gray color better and ordered the glass panel in that color.
Switches from Livolo are assembled with very high quality and meet all European standards for electrical products. The switch body is made of heat-resistant plastics, and the tempered glass panel can withstand temperatures up to 300 C. The terminals for connecting wires are made of brass.
The front panel is a sensor that transmits signals to turn off or turn on the lighting to the control module. Touchpad attached to the switch with latches. To install the panel in its place, we bring it to the body and lightly press it until a characteristic sound is heard.
All touch-sensitive light switches have an eye-pleasing LED backlight that changes color depending on the state of the switch. When the switch is in the off position, the backlight glows blue, and when the switch is in the on position, it glows red.

To turn it on or off, just touch the sensor with your finger in the highlighted area (circle). The lighting circuit is switched by an electromagnetic relay, so when the switch state changes, you can hear a slight click.
The touch switch is equipped with open circuit protection. When might a regime arise? The most commonplace is the burnout of the llama or the tripping of the circuit breaker in the panel, or the disappearance of the mains voltage. If such a situation occurs, the switch automatically switches to the “off” mode and remains in it even when the power supply is restored. After eliminating the fault, the switch can be turned on in normal mode, by touching the panel or using the control panel.
These switch models have a built-in radio module for remote control. Control is carried out by pressing the button on the control panel once. The control panel allows you to control the switch at a distance of up to 30 meters from any room in the house (not necessarily in direct view of the device). The remote control runs on a 12 Volt battery, which is not included in the price.
Technical characteristics of livolo touch switch
Nowadays, touch control is present in almost all household appliances. The everyday use of this technology has led to the introduction of such a function in light switches. The front panel of the device is made of optical glass OptiWite has an unusual design, which allows it to find its place in any interior design.

According to their own technical specifications, touch light switch VL-C701R and VL-C702R in no way inferior to a classic push-button switch.
Main technical characteristics:
- 2. Maximum load current: 5A;
- 3. Supply voltage: up to 250 Volts (frequency 50-60 Hz);
- 4. Own consumption: less than 0.1 mW;
- 5. Mechanical life: 100 thousand switchings;
- 6. Remote control distance: up to 30m;
- 7. Ambient temperature: from -30°C to +70°C (humidity 95%);
- 8. Dimensions (h*w*d): 80mm * 80mm * 40mm;
- 9. Housing protection degree: IP20.
What types of lamps can be switched with a touch-sensitive light switch? Dear friends, as you know, today the problem of blinking LED and energy-saving lamps is very relevant. This is due to the backlight used in light switches. I have written about this several times in my articles, if you are not already aware, you can read one of them: the reason for the blinking of an LED lamp when it is off. It describes not only the reason, but also the way to solve it.
The livolo company assures that any type of lamp can be used with their company’s touch switches, from conventional incandescent lamps to the LED lamps and strips that are already familiar to everyone. But this barrel of honey has its own fly in the ointment.
The only drawback of the VL-C701R (VL-C702R) is the illumination (or blinking) of low-power LED and fluorescent lamps (up to 15 W) when the switch is off. That is, if a lamp(s) are connected to the switch total power less than 15 W, then the lamp may blink when turned off.
As a solution to this problem, Livolo suggests using special LED adapters. I did not buy such an adapter. We will check this in a video review - watch it soon on the YouTube channel.
A little about marking designations
As you may have noticed, dear friends, the text of this article contains designation markings such as VL-C701R and VL-C702R. All these numbers and letters carry some kind of information, let's try to decipher Chinese logic.

The marking of each touch switch begins with the letters “VL”; this is a well-encrypted name of the manufacturer’s company - “ Livolo" Immediately after the hyphen there is the encoding “W, R, C6, C7, C8” - this is the designation of the device series. The numbers following the series in the code (01, 02, 03 ...) are the designation of the number of switched lines (that is, a one-, two-, three-key switch). At the end of the list there is a Latin letter (there may be several). R – radio control capability; S – pass-through switch; D – dimmable sensor; T – switch with built-in timer (turns off after 30 seconds).
Setting up the control panel
Touch switches look really very stylish - they will look great in the living room, in the hallway, in the kitchen, and anywhere. Another good thing about such devices is that they can be controlled remotely. To do this, you just need to order a universal remote control online. Price of this device, which is a keychain with a carabiner and a metal front panel, is not that big.

There are four buttons on the remote control panel, they are designated in Latin letters - A, B, C, D. This device operates on a 27A battery with a voltage of 12 volts. This remote control is compatible with a variety of touch switches, in particular with popular LIVOLO brand switches series C6 and C7.

Setting up this remote control is quite simple. First of all, you need to press the touch switch button (while it itself must be in the “off” position) and hold it until the “Pi” sound signal is heard from the touch device - this is about 5 seconds.
Then you should press one of the buttons on the remote control (A, B or C), as a result of which another sound signal should be heard - it means that the “binding” procedure is completed. Now the button that we pressed on the remote control during binding can be controlled (disabled, enabled) by touch switches at a distance. All other buttons on the switches are linked to the remote control in exactly the same way.

It is worth noting that several touch devices can be assigned to one button on the remote control. That is, several buttons and even several remote controls can be linked to one sensor. There is information on the Internet that you can make 8 such bindings (I haven’t tried it myself).
Detaching the sensor from the remote control is also very simple. To do this, touch the sensor and do not release it for about ten seconds. After five seconds the first beep will sound, but this should not be taken into account. And only when another, second beep is heard, all previous settings will be reset.
Universal operating range control panel VL-RMT-02 is 30 meters. This is quite enough for everyday use - the remote control will properly perform its functions throughout the entire territory of an ordinary apartment.
Connecting a single-key touch switch Livolo VL-C701R
So, let's figure out how to connect a 220 Volt touch light switch. In essence, it is no different from the connection diagram for a single-key switch.
On the switch body there are two terminals marked “L-in” and “L-load”. The “L-in” terminal, the literal abbreviation of which sounds like “live line terminal”. If we use electrical engineering translation, it means approximately the following: “live line” - live line, “terminal” - contact, contact screw. In general, this is a contact for connecting the PHASE wire (the one that came from the distribution box).

The “L-load” terminal in the instruction manual is called “lightin terminal”, translated approximately like this: “lightin” - lighting devices, “load” - load. That is, this is a contact for connecting the wire that goes to the lighting load (the wire that goes to the lamp or chandelier).
As you can see, there is nothing complicated in this “electronic miracle”, everything is like in a regular switch, two terminals “phase-input”, “phase-output”. We strip the wires to the required length and connect them to the terminals.
If you install a touch switch to replace the old one, we simply unscrew the wires from the old one and connect it to the new one. The main thing is to decide where the phase is and connect it to the desired contact of the touch light switch ("L-in" contact).

The only thing I would recommend is that if you use a cable with a stranded core, use NShVI lugs. The touch switch has screw-type terminals, and if you push a bare stranded wire there when tightening, you can easily crush it.
This is what the Livolo switch looks like from the side

How to connect a two-key touch light switch Livolo VL-C702R
The VL-C702R switch is designed for switching two independent lighting lines (as evidenced by coding 02); simply put, it is a two-key switch. And there is no difference between its diagram and the connection diagram of a two-key switch.

On the back of the sensor you can see not two, but three terminals for connecting wires: “L-in”, “L1-load” and “L2-load”. The “L1-load” and “L2-load” terminals connect wires going to a group of lamps (each to its own group).


We fasten the mechanism in the socket box
Regarding the sensor installation. Installing a touch light switch carried out in a regular socket box. There are no spacer tabs for fixing it, so the switch support is secured in the socket box with screws. By the way, screws are included with each sensor.

Touch switches are, of course, a new word in household lighting control technologies. Their convenience and comfort are obvious, and their cost is gradually decreasing. All this suggests that soon touch-sensitive devices and remote controls for them may en masse replace the usual push-button switches.
Using a touch switch, you can control not only various lighting fixtures, but also use them to control curtains or as a doorbell. Exist Various types switches. Below is a list of switches and their connection diagrams.
Important instructions for installing touch switches
Installation of all touch switches is carried out without connecting to power and without a glass panel! The glass panel must be installed on a switch to which no power is connected (the machines are turned off). The glass panel can be removed using a flat screwdriver. To do this, insert a screwdriver into the hole and carefully turn it until it clicks.
- Unpack the switch.
- Connect the light switch.
- Screw the light switch flush into the mounting box.
- Secure the front panel; there should be a “click” sound.
- Turn on the power (automatic).
- The switch will work after the sensor self-adjusts for 1 minute.
If you did not follow these instructions, the switch may not respond to touch.
One touch switch Livolo
- It has one touch button that works in on/off mode.
Single-touch switch connection diagram:
Setting up remote control of Livolo switches
Switches that support remote control in the product article they have the letter R. To set up the remote control, you need to program the operation of the switch with the remote control.
- Press the sensor on the switch and hold it for about 5 seconds. until the beep sounds,
- Press a button on the remote control (eg button A).
- You will be informed about the completion of synchronization by a sound signal. Press A to turn on the light, press A again to turn off the light.
- Possible programming of buttons on the remote control: A, B and C – ON/OFF, D – turn everything off.
- For a dimmer, after synchronizing the remote control, the function of the button is as follows: A – ON, B – increase brightness, C – decrease brightness, D – OFF;
To cancel synchronization, touch and hold the sensor for 10 seconds until you hear a double beep. If you release the sensor after the first beep or after the first flicker of the backlight, synchronization will not be canceled
Video guide for synchronizing Livolo touch switches with radio control function with remote control:
It is possible to turn on several switches at once with one button on the remote control. For example, you need to illuminate the path from the room to the kitchen through the corridor. A video guide on programming lighting scenes using Livolo switches with remote control function will help you:
Livolo two touch switch
- The switch is used to control two load lines from one location.
- It has two touch buttons, each of which operates in on/off mode.
- On the back of the switch there are three terminals for connecting a phase and two load lines.
Connection diagram for a two-touch switch:
Pass-through single touch switch Livolo
- Switches are used to control one load line from two or more places.
- It has one touch button on each switch, each of which operates in on/off mode.
- To connect the Main switch, three terminals are used: 1) phase input, 2) output of one load line, 3) information COM wire.
- It is possible to connect up to 8 touch switches in one circuit. There can be no more than 8 sensors in a chain.
Connection diagram for Livolo pass-through switches:

Connection diagram for Livolo pass-through switches to wiring made for key switches

Attention! Function pass-through switch starts working only after synchronization with the same switch. Without synchronization, the light will only turn on the Main switch.
Step 1: Touch the Main Switch sensor and hold your finger until a beep sounds (about 4-5 seconds). Remove your finger from the sensor area.
Step 2: Touch the secondary switch sensor to synchronize for half a second. If the backlight blinks, it means synchronization is complete.
Video guide for synchronizing two Livolo pass-through switches:
Reset sync:
Touch and hold the Main Switch sensor until the second beep sounds (about 10 seconds later). Synchronization will be reset.
Video guide for synchronizing three Livolo pass-through switches:
To cancel synchronization, you must hold the sensor on the Main switch for 10 seconds until the second beep. Synchronization will be reset.
Pass-through two-sensor switch Livolo
- Switches are used to control two load lines from two or more places.
- It has two touch buttons on each switch, each of which operates in on/off mode.
- The circuit uses Main and Secondary switches.
- To connect the Main switch, four terminals are used: 1) phase input, 2) output of the first load line, 3) output of the second load line, 4) information COM wire.
- To connect the Secondary switch, two terminals are used: 1) phase input, 2) information COM wire.
- It is possible to connect up to 4 touch switches in one circuit. There can be no more than 8 sensors in a chain.
Connection diagram for Livolo two-sensor pass-through switches:

After connecting the pass-through switches, they must be synchronize For collaboration.
Connection diagram for Livolo double pass-through touch switches to wiring made for key switches
After connecting, there will be two unused wires left.

An example of the implementation of lighting in a bedroom using Livolo pass-through switches
- Implement control of the general lighting of the room from three places: at the entrance to the bedroom, next to the bed, to the right of the bed.
- Implement control of sconces on the left of the bed and on the right of the bed.

Annotation. After connecting and synchronizing, the light control in the room will be like this:
- Lamp No. 3 is controlled from switch No. 1, No. 2, No. 3;
- Lamp No. 1 is controlled from switch No. 1
- Lamp No. 2 is controlled from switch No. 2
Connecting a two-touch and two single-touch Livolo pass-through switches
Task: Implement control of two lighting zones from three places.
The connection diagram for Livolo pass-through switches in this case will be as follows:

After connecting the pass-through switches, they must be synchronized to work together. See video example of synchronization above on this page.
- Lamp No. 1 is controlled from switch No. 1, No. 2;
- Lamp No. 2 is controlled from switch No. 2, No. 3
Connecting two-touch and one-touch Livolo pass-through switches

After connecting the pass-through switches, they must be synchronized. See video example of synchronization above on this page.
Abstract: After connecting and synchronizing, the light control in the room will be like this:
- Lamp No. 1 is controlled from switch No. 1;
- Lamp No. 2 is controlled from switch No. 1 and No. 2
Livolo touch dimmer
- A switch is used to control one load line from one location.
- It has one touch button that works in the mode of adjusting the brightness of the lamp.
- On the reverse side of the switch there are two terminals for connecting a phase and one load line.
Touch dimer connection diagram:
Video guide on how to control lighting brightness using a Livolo touch dimmer:
Control of a touch light switch with a dimmer (dimmer):
1. Briefly touch the switch sensor to turn the light on/off.
2. While holding your finger on the sensor, adjust the brightness of the lamp.
3. When turned on again, the dimmer ensures the brightness of the lamp installed before turning off.
Note:
1. Only suitable for dimmable LED lamps, incandescent lamps or dimmable floodlights.
2. The switch is not suitable for fluorescent lamps.
3. Load power must be at least 25 W, no more than 500 W. The switch may become slightly warm.
LED adapter
In some cases, for the touch light switch to work correctly with LED lamps, it is necessary to install an LED adapter to prevent the lamps from flickering when turned off.
LED adapter connection diagram. The adapter is connected in parallel to the load.

LED adapter connection diagram when using LED strip. The adapter is connected in parallel to the transformer into a 220 volt network.

If there is a zero in the installation box where the switch is installed, then the adapter can be installed near the switch. The scheme will be like this.

The switch has an intelligent processor. Electronics controls the entire load management process. In the event of a circuit break, the touch switch with its advanced control circuit is simply switched off, so we have an additional autonomous safety system. Depending on the position of the rotor, the load created by the hood is variable. In some cases, the load approaches zero, which causes the circuit breaker to trip. You can train the switch to work correctly with the hood using an adapter. Connection diagram for the hood adapter:

Starting current stabilizer
Using the Starting Current Stabilizer, the touch switch will work correctly with motors, such as hoods, or powerful transformers for 12-volt LED strips, LED lamps with drivers, which, when turned on, consume a current tens of times higher than the rated current - 5A.
Connection diagram for Stabilizer and Adapter:

Livolo touch switch for curtains, blinds, gates.
- The switch is used to control one motorized drive for curtains, blinds, and gates.
- It has two touch buttons that work in open/close mode.
- On the back of the switch there are 5 terminals for connection phases, zero, and two motorized drive terminals.

Video guide for controlling curtains, blinds, gates using the Livolo touch shutter switch:
Livolo dry contact switch
- The switch is used for Smart Home systems.
- It has one or two touch buttons that operate in pulse mode.
- On the reverse side of the switch there are two terminals for connecting a phase, zero and one or two independent lines.
Dry contact switch connection diagram:


Button

Livolo thermostat
Thermostat with built-in temperature sensor

Thermostat with floor temperature sensor

Thermostat with built-in temperature sensor for gas heating systems

Switch for Smart hood
Connecting a touch switch to a hood with a humidity sensor and timer
To connect, you need a zero in the socket box!

Connecting two touch switches. The first sensor turns on the light, the second is connected to a smart hood with a humidity sensor and timer

Connecting the Livolo master button
Turning off the lights in the entire house from one place.