Correct configuration of the Rostelecom modem: ADSL, DSL, D-Lnik, TP-Link. Setting up an ADSL modem How to connect a modem to a link
The DSL 2500U modem from the D-link company is another router of the DSL family, outwardly not much different from its older brother, but significantly inferior to it in terms of technical characteristics.
Router d link dsl 2500u: technical specifications
With a detailed list technical characteristics The d link dsl 2500u router can be found in the following illustrations:


Brief review of the d link dsl 2500u router
Like most routers, on the front panel of the d link dsl 2500u router there is a number of indicators that inform the user about the following aspects of the device’s operation:

- “POWER” - availability of power supply to the router;
- “STATUS” - the operating status of the router and possible errors in the system (if the indicator is inactive or, conversely, is constantly on);
- “LAN” - connection and activity of network devices;
- “DSL” - DSL synchronization status;
- “Internet” - informs about the presence of an Internet connection and possible errors(if the indicator is red).
There are four elements on the rear panel:

- “DSL port” - for connecting the router to the telephone line;
- “LAN port” - for connecting network devices;
- “Reset” - button to reset the d link dsl 2500u router settings to factory settings;
- “5V=1A” - connector for connecting a battery.
Installing and connecting a Rostelecom modem
The principle of installing and connecting the d link dsl 2500u router is elementary and no different from other models:
- in a well-ventilated place away from heating elements, protecting the modem from direct sunlight;
- connect the switched off router (dsl port) to the internet line (telephone cable or cable coming from the splitter);
- to the “LAN” port;
- connect the power supply and turn on the router.
Setting up an Internet connection on a d link dsl 2500u router
To gain access to the router’s web interface, use the address 192.168.1.1, which must be entered in the address bar of any Internet browser (the default login and password is “admin”).

The illustrations below correspond to the latest firmware version 1.0.50.
When you first log into the router interface, a window will appear asking you to carry out the initial settings of the router.

You can use either the “Setup Wizard” - in order to configure the d link dsl 2500u router in a semi-automatic mode and select only the basic parameters, or the “manual setup” - in order to “carefully” set all the necessary parameters.
In this article, we will consider in detail the manual configuration of the modem in order to have a more complete understanding of the network created by the router.
Setting up a d link 2500u modem using the “Setup Wizard”
Sequence of actions when automatic configuration router is shown in the following illustrations:


Advanced settings of the d link 2500u router
To create an Internet connection manually, open the “Network” menu, the “WAN” section and click “Add”.

The “Create WAN connection” window will open in front of you: here in the “Connection type” line you need to select one of the proposed options, based on the data specified by the provider in the contract (the same applies to filling out the user name, password and atm interface).
"Bridge"

- enter the value “VPI” and “VCI” - depending on the region and service provider;
- check the boxes for “NAT” and “Firewall”.
"PPPoE" or "PPPoA"

Here, in addition to the parameters described above, you should specify:
- “Username” and “Password” (twice);
- if desired and necessary, enable the parameters “Connection on demand”, “PPP IP extension”, “PPP debugging” or “PPPoE forwarding”.
"Static IP"
"Dynamic IP"
For of this type There is no need to specify any connections.
Once you have completed entering your data, save your settings.
Setting up IPTV
Since the d link dsl 2500u modem offers only one “LAN port,” you will have to choose what to provide Internet access for: a TV set-top box or a computer.
In the “Days of Execution”, “Start Time of Execution” and “End Time of Execution” blocks, you must set the time interval during which the prohibiting rule will be in effect.

Go to the next section “URL filter” and check the box “Enable/disable URL filter”.
You can block both individual addresses and all addresses except permitted ones.
Select one of the options and click "Change".

The next window contains two lines:
- “URL address” - here you need to specify the address of the site that will be blocked by the router (or, conversely, added to the allowed ones - depending on your choice).
- “Port” - for the “http” protocol, port 80.

Thus, this model is not equipped with the ability to create a wireless network - this fact and rather weak technical capabilities have long sent the “2500U” into a well-deserved “retirement” and been removed this model from production.
The ADSL modem, produced by the well-known Chinese company D-Link, supports both outdated ADSL technologies and newer and faster ADSL 2 and ADSL 2+. ADSL 2+ speed reaches up to 24 Mb/s. This is a budget router that does its job well. Next, we will find out how to configure the d link 2500u router, its appearance and characteristics.
Packaging, equipment of the D-Link 2500u router
The box in which the router is supplied is made in orange colors; the router and its main characteristics are depicted in the foreground.
Router packaging
Separately, a large icon mentions support for ADSL 2/2+ technologies. On the side of the box the delivery contents and minimum requirements are listed. system requirements to a computer connected to the Internet. On the back of the box there is a diagram for connecting the router to a computer, and the device interfaces are described.
Inside the box there was quite an impressive set:
- The router itself is d link dsl 2500u;
- Power supply 9 V;
- Splitter;
- Two RJ-11 telephone wires;
- Ethernet network cable RJ-45;
- Guide quick installation in Russian;
- CD with digitized instructions;
- Warranty card.

Router equipment
The telephone cord included in the kit is quite short. Since the d link 2500u router is not equipped with a Wi-Fi module, this must be taken into account when searching for the location of the router.
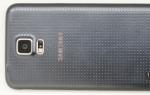
Appearance of the D-Link 2500u router
The router case is made of black plastic with a gray insert on the front panel, inside of which there are information indicator LEDs.

Appearance and front panel of the router
On the top of the cover there is a company logo and ventilation holes for cooling the device.
Indicator LEDs inform the user about the current status and connection status of the router: power availability, passing traffic, connection to the LAN port, connection to the provider and connection to the Internet.
All ports and connectors for connection are located on the rear panel:

Rear panel of the router
The reset button is used to return the router settings to the factory default settings. To reset, you need to press the recessed button with something sharp and hold it for about 10 seconds until all the lighted indicators on the front panel simultaneously go out and light up again. You can connect to the LAN port as a computer to create local network, so and the other wifi router the characteristics of which allow you to create a scalable local network (more than one computer).
Connection diagram for D-Link 2500u router
The router connects to the provider's network via a DSL port (gray), but not directly, but through the included splitter.

Router connection diagram

Router connection diagram
The splitter is connected as follows: into the connector marked LINE – connect telephone line, into the socket marked as PHONE - connect a telephone set, into the socket marked as MODEM - connect a router.
Bottom of the router
There is a sticker on the bottom of the router on which you can read the hardware version of the device, the MAC address set by the manufacturer, and other useful information.

Preparing your computer for the settings of the D-Link 2500u router
Make sure the router is connected to your computer and turned on. Configuration is done from any web browser installed on the computer. The first step is to make sure that your computer is configured correctly. To do this, go to the tab “ Network connections» control panel, and press right click mouse by network connection. In the drop-down menu, click “Properties”.

Selecting to view network connection properties

TCP/IP Settings
In the window that opens, select the “Use the following IP address” item and fill in the fields - in the “IP address” line we write 192.168.1.2, in the “Subnet mask” line we write 255.255.255.0. Click "OK".

Entering the device's network address and subnet mask
Entering the settings of the D-Link 2500u router
To enter the router settings menu, you need to open any web browser and enter 192.168.1.1 in the address bar. This is the default network address of the router set by the manufacturer. Click “ENTER”.
The router will require you to enter a username and password to enter the settings menu (this data can be found in the router description section of the instructions):

Entering your username and password
In the “User” line enter “admin”, in the “Password” line – also “admin”. Click “OK”.
Attention! If at any stage of entering the settings menu an error is given, then there is a possibility that the router has already been configured and the name, password or network address have been changed. It is necessary to reset all settings to factory settings, as described above.
D-Link 2500u router settings
Wifi router description in detail can be found by downloading the instructions at
http://ftp.dlink.ru/pub/ADSL/DSL-2500U_BRU/Description/Manual_DSL-2500U_RUS.pdf
In this article we will consider only the basic settings.
If the username and password have not been changed, the initial router settings menu will open. Depending on the firmware version, the appearance of the settings menu may differ, but the structure and principle of settings do not change.

Initial router settings menu
On this page you can see the firmware version, network address devices, traffic speeds and other information. Settings items are located on the left of the window.
Setting up port forwarding on the router
For example, let's configure port forwarding for a counter-strike game. To do this, go from the “Advanced Setup” menu, then to the “Virtual Servers” submenu.

Port forwarding on the router
Select the item “Custom Server”, and in the line write the label – Couter Strike Source Server.

Setting up router ports
In the “Server IP Address” line we write 192.168.1.2. This is the IP address of our computer. Click the “Save/Apply” button for the changes to take effect.
Setting up the router in bridge mode
To configure the router in “Bridge” mode, go to the “Quick Setup” tab

Uncheck the “DSL Auto-connet” box, enter “0” in the “VPI” field, and enter “33” in the “VCI” field. Next, click the “Next” button. A window for selecting router modes will open:

Selecting the router operating mode
In this window, select the “Bridge” item and click the “Next” button. In the following windows we leave the default values:


In each window, click the “Next” button. Next, the final settings window will open:

The last bridge mode settings window
Since all values are set by default, there is no point in checking the data specifically. Just press the “Save/Reboot” button, after which the router will automatically reboot.
After the reboot, a window will appear informing the user that the settings were successful.

Operating the router in bridge mode
That's it, the dsl 2500u router works in “bridge” mode, providing a small local network with a shared Internet connection.
This article is devoted to connecting and setting up the D LINK 2640U modem. Here you will find complete step-by-step instructions, learn how to connect a router via a router, how to organize a Wi-Fi network that is secure and encrypted from other PC users, as well as Network settings for different providers.
Connecting a modem
In this section we will look at how to connect a modem to a computer.
First of all, the router should be connected to power - insert the end of the wire from the power supply into the corresponding socket on the back of the modem, and the power supply itself into the outlet.
On the back side of your modem (router) there are 4 LAN inputs at once. It is there that insert one of the ends of the blue wire that comes with the D-LINK 2640U, and insert the other end into the LAN port on your PCM.
At the same time, be careful: the LAN light on your router should light up with the number of the modem port into which you inserted the local wire. In this case, both ends of the wire must be in place (port on the PC and port on the router).
After this, go to the next tab of the instructions, where you will be asked to connect your modem and splitter.
There is one more cable included with the modem - insert it into your splitter (separator), and place the other end of this cable into the corresponding port of your router - “LINE”.
Factory settings Each device has its own “factory settings”. About how to reset D-LINK settings
2640U to the factory ones, and we will go further. You have to reset the settings to factory settings if you simply cannot go to the modem settings menu, or the modem was configured incorrectly.
- The “RESET” function is available on every router and using it is much easier than you think:
- find a needle or awl at home, look at the back panel of your router, where you will see a small hole labeled with the word “RESET”;
- this is it: insert a needle (match) there, wait about 5-6 seconds. In this case, the router must be turned on;
After this time, all the lights on the router will go out one by one. It may restart, which means that the modem settings have been reset to factory settings. Now you know how to reset D-LINK 2640U.
Video: Setting up the D-LINK 2640U router
Login via web management
- check whether the modem is connected to the computer and the splitter (the Line and LAN lights should be on);
- after that, open your browser (Opera, Chrome) and enter the IP address 192.168.1.1. You will find yourself in a web management window where you can either update your modem or configure it automatically or manually.
Firmware update
In this section we will tell you how to properly update the firmware of your router. After purchasing each device, we advise you to check for the latest firmware (updates), which will ensure trouble-free operation for a longer period of time.

ADSL connection parameters
ADSL connection parameters are very important, because both the speed of your Internet connection and its uninterrupted operation will depend on them.
As described earlier, go to the web control panel of your modem:
- Open your browser and enter 192.168.1.1 in the address bar. Enter your username and password (admin/admin by default) and click on the login button;
- go to the “Network” tab, to the WAN section. If you just purchased the router, you should remove all connections. Use the “Delete” button to do this;

- then click on the “Add” button and enter your Internet connection parameters;
- and then follow the instructions below, because the ADSL connection parameters directly depend on your Internet provider.
- open your browser, enter 192.168.1.1 in the address bar and press Enter/;
- enter your username and password (default – admin/admin) and click on the login button;
- go to the “Network” tab, and from there to the “WAN” section. Clear all Internet connections using the "Delete" button.
How to configure the D-LINK 2640U router for providers
To connect the D-LINK 2640U router, you must first connect the router itself to the computer.
If you do not have signal separation, when you need simultaneous operation of both the telephone and the Internet, then do the following:

Rostelecom
Click on the "Add" button and enter the following parameters:

Domolink

Specify the following options:
- VPI=0;
- VCI=35;
- PPPoE type;

- then fill in your login (username) and password (password), received from the provider when registering the connection;
- check the “KEEP ALIVE” checkbox.
Simply skip the remaining pages with the NEXT button and confirm the settings with APPLY. Click the FINISH button to complete the router setup. In a couple of minutes the connection will be established.
MGTS

Ukrtelecom
Go to the configuration menu of your router via web management. And to do this, enter 192.168.1.1 in the browser and press Enter. Enter your username and password, click on the login command.
Uncheck DSL Auto-connect, and then proceed to configure the modem:

Save and wait about a minute for the router to reboot.
Setting up a modem in router mode
The modem can be configured both in router mode and in bridge mode. To configure the modem in router mode, open the web control panel. To do this, open your browser and enter 192.168.1.1 in the address bar. Next, enter your username and password (by default – admin/admin), log into the panel and go to WAN settings. Now you will need to fill out the network parameters, which can be obtained from your provider, or read in the sections above.
Wi-Fi network
Go to the web control panel of your router:

Carry on wifi setup, you can now enter your network security settings:

In the article, we looked at all the options for setting up the D-Link DSL-2640U router, from connecting it to power and your PC, to setting up Internet settings for different providers. We hope that our article was able to fully reveal the answers to your questions.