From a hard drive with your own hands. What can be done from old hard drives? Flash drive for emergencies
Introduction.
Most laptop owners sooner or later face the problem of running out of space. As a rule, laptops with screen sizes up to 15 inches inclusive do not have a free second slot for a 2.5-inch device. Therefore, owners are forced to think about either replacing the laptop itself or replacing its hard drive. After replacing the hard drive, there is always an old drive left, which can easily be turned into an external one USB drive for data transfer.
Naturally, you can purchase a 2.5 inch mobile HDD and turn it into an external drive. Fortunately, the cost of external drives allows this. For example, at the time of writing, for a 250 GB mobile hard drive they are asking $40, and for a 500 GB device from WD they are asking only $45.
We decide on the type of hard drive.
To be fair, it should be noted that an ordinary desktop 3.5-inch hard drive can also be turned into an external drive - you just can’t call it mobile. If you have an unused 2.5 or 3.5 inch hard drive, then first of all you need to decide on the type of its interface.
Today on the market there are the following types of interface: IDE (ATA) and various SATA options. As a rule, all SATA interfaces are backward compatible with each other, and we will not dwell on their variations. The situation is completely different between IDE and SATA interfaces, which are absolutely incompatible with each other and have different connectors.
The picture is clickable --
The figure shows two hard drives with different interfaces. Hard drives have a mobile format of 2.5 inches. On the left is a hard drive with a SATA interface, on the right is a hard drive with an IDE interface.

The picture is clickable --
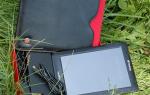
In our hands was a 250 GB hard drive from Western Digital Scorpio Blue series with SATA interface. This drive has been used for a long time Acer laptop, but its capacity became insufficient, and it was replaced with a more capacious 500 GB solution.

The picture is clickable --
Despite long-term use, the performance of the hard drive did not cause any complaints, so it was decided to use it as an external mobile drive. To do this, we had to find an external case for it, which is what we did. External case AGESTAR for 2.5 inch mobile hard drive.
Computer hardware stores offer a wide variety of external cases for 2.5-inch hard drives. Their key difference is as follows:
- body material,
- type of external port (interface),
- cost.
As a rule, stores offer various cases with a USB 2.0 interface, a much smaller number of cases with an eSATA interface, and even fewer cases with a combination of USB 2.0&eSATA. Several cases with a modern USB 3.0 interface were found on sale, but their cost exceeded the cost of the hard drive itself, so we did not consider them.
The key difference between USB 2.0 and eSATA interfaces is data transfer speed. Using the USB 2.0 interface allows for maximum compatibility, since these ports are available on all computers. A significant disadvantage of the USB 2.0 interface is - low speed data transfer, which will not allow you to unlock the full speed potential of your hard drive.
The eSATA port is more promising, but it is not widespread and is found only in expensive versions of motherboards, cases and laptops. The eSATA interface allows you to fully unleash the potential of SATA devices.
The material used can also be very different. In a simple case, it is plastic. In more expensive variations, an aluminum case with a leather cover is included.
The cost of external cases also varies. The cheapest option will cost the user $3, expensive versions will cost more than $100.
Buying a $100 case for a hard drive that costs less than $40 when new and is half the price once it's in use is, to say the least, wasteful. Therefore, for testing we were provided with a case costing a symbolic 3 dollars - AgeStar SUB2P1. Equipment and external inspection of AgeStar SUB2P1.

The picture is clickable --
We didn't expect any miracles from a device that costs three dollars, both in terms of equipment and in terms of performance. The device comes modestly packaged in a package. The front wall of the device is covered with a cardboard listing the key characteristics of the device. This includes support for 2.5-inch mobile hard drives or solid-state drives with a SATA interface, the presence of a USB 2.0 data transfer interface and various color options.
To be fair, it should be noted that our suppliers confirmed that they had not seen any other color for this case other than black.

The picture is clickable --
After opening the package, we were pleasantly surprised by the fact that the kit included an instruction manual entirely in Russian.

The picture is clickable --
The case is completely made of plastic. There are paper stickers on the front wall indicating the model, which will be erased in any case, so we recommend immediately removing them from the surface of the device.

The picture is clickable --
The material used to make the case is soft black plastic, which does not smell of anything and is uniform throughout its structure.

The picture is clickable --
The covers of the device come off in two different directions, which ensures easy removal and installation of the hard drive in an external case.

The picture is clickable --
The two sides of the outer case are secured using a plastic latch made from the material of the case. Thanks to the recesses on the walls, the lids are securely fixed and spilling any glass of liquid, or leaving the device in the rain, is unlikely to lead to any problems.

The picture is clickable --
The device is designed for SATA hard drives, which we have repeatedly emphasized. Inside there are controllers with SATA ports for power and data transfer.

The picture is clickable --
On the side wall there is a mini USB port for data transfer and power supply to the hard drive. There is no additional port to provide power to the drive, which may cause some problems for users. With a weak power supply that underestimates the voltage along the 5 volt line, you often have to deal with problems starting the hard drive. Typically, connecting the drive directly to a port on the motherboard rather than on the case system unit, the use of a high-quality USB cable allows you to forget about this problem.

The picture is clickable --
Sellers of computer components often, as an advantage of this or that external case, talk about the presence of a USB data cable in the kit or offer to purchase it separately if it is not there. We advise our users not to pay attention to this, since a mini-USB-USB cable, as a rule, is available in almost every family and is often supplied with mobile phones. In our case, we successfully used a stale data cable from mobile phone Nokia.

The picture is clickable --
The next step was to install the hard drive into the case. This is done quite simply - by lightly pressing. The most important thing is to first correctly rotate the hard drive according to the power and SATA data ports located in the case.

The picture is clickable --
The absence of any protruding elements on the hard drive controller circuit allows you not to worry about its rear surface when transporting and using the device.

The picture is clickable --
Some users may argue that the plastic case does not provide adequate heat dissipation from the hard drive. Naturally, external cases made of aluminum cope with this task much more effectively. At the same time, we should not forget that mobile hard drives do not have such high power consumption that they suffer from overheating, and in laptops, as a rule, they are not additionally cooled with anything.

The picture is clickable --
After completing the assembly of the device, the stage of its testing and use begins. The supply of voltage to the device is accompanied by the glow of a blue LED, which also symbolizes the user about the process of data transfer. It should be noted that not everyone will have a smooth start when starting to work with the created external drive. If the hard drive has already been used, has been formatted and partitions have been created on it, you will not have any problems getting started. It works like a regular flash drive using the Plug&Play method. But those users who purchased a new hard drive without formatting and with no partitions will have a problem that will be associated with the absence of a drive letter in the “My Computer” tab.
To do this, you need to create partitions on the hard drive and format it. This can be done through various boot disks, but it’s better not to bother and do it in the Windows operating system itself.

The picture is clickable --
To do this, you need to go to the "Control Panel" through the "Start" section, then visit the "Administration" section. In this section, select “Computer Management”, where in the “Disk Management” tab you can partition and format the newly connected external drive. After creating partitions and formatting them, you will have access to them through the “My Computer” tab and you will be able to exchange with the drive as with a regular hard drive. Test configuration.
The assembled external drive was tested both on a desktop computer, based on a modern Core i7 processor and an equally modern motherboard, and on an Acer Aspire 7730 laptop based on a Core 2 Duo processor. It should be noted that the level of performance on two different systems turned out to be comparable.
1. Data reading speed was tested in the HD Tach 3.0.4.0 program

The picture is clickable --
It is pleasant to note that the external drive we assembled shows a much higher level of performance than the WD My Passport Essential external hard drive we previously tested. The maximum data transfer rate was 34.3 Mb/s, and the average latency was about 17.9 ms.
2. Data reading speed in HD Tune 4.5.

The picture is clickable --
In the second synthetic test, we received data similar to the previous ones, which also turned out to be slightly better than that of the official external hard drive WD My Passport Essential.
3. Write speed of 64 MB files in HD Tune 4.5.

The picture is clickable --
Testing that is closer to practice is somewhat more valuable, by recording files of 64 MB in size. In this test, we received quite expected results, which were also limited only by the capabilities of the USB 2.0 interface.
Separately, I would like to note that throughout the entire testing, the temperature of the hard drive did not exceed 35 degrees Celsius, while a similar hard drive installed in the laptop had a temperature of about 43 degrees. Therefore, worrying about the operating conditions of the hard drive in this case on the part of users will be unnecessary.
4. Download speed operating system Windows 7.

During practical testing of the loading speed of the operating system image Windows systems 7 we received results similar to other external drives with a USB 2.0 interface.
5. Assessing drive performance in Windows 7 environment.

We tested the performance of the external drive we assembled using the Windows 7 operating system. To do this, command line you need to call the command: “winsat disk -drive g -ran -write -count 10”, where “g” is the letter of the drive being tested in the system.
From the test results it is clear that the drive we assembled received a much higher rating than the factory solution WD My Passport Essential.  Conclusion.
Based on the materials in this article, it is clear that any mobile hard drive can be turned into a good external drive without any hassle. Especially for testing, we asked for the cheapest external case, costing $3. Three dollars allows you to get an excellent external drive from a mobile hard drive, at least for data storage. Not to mention the fact that the same external case makes it easier to recover data from the hard drive of “dead” laptops.
Despite the fact that many people criticize AgeStar's products for their low quality, after many years of using them I have only a positive impression of them. First of all, it is at an affordable price. Defects occur in all manufacturers, although AgeStar has a slightly higher rate than Thermaltake. But the latter has no analogue to the presented external case for three dollars and with a 6-month warranty. We award AgeStar products with a gold medal of honor for their optimal performance/price ratio.
If your hard drive is broken and cannot be restored, then, as in the joke, you can get an ashtray, a mirror and a magnet from it :) In fact, you can get MUCH more, and I will now tell you how to do it and what is there interesting.
If you don't have a faulty hard drive(hard drive) - don’t be upset, contact your computer friends, or just friends, or any service center computer equipment, they should definitely have such copies (usually in workshops men are too lazy to throw away old trash). The “older” the disc, the better: before, they didn’t skimp on material and all sorts of things.
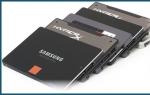
For the master class, I took as many as three pieces (I saved for a long time) to show the possible differences (although they are usually all different, you will never guess what is under the cover this time) In addition to the hard drive itself, we will need screwdrivers (minimum - Phillips and flathead (" +" and "-"), maximum - a set of screwdrivers as in the photo on the left top corner, namely the hexagonal star attachment).

This photo shows that there are different thicknesses. It’s better (if you have a choice) to take a thicker one, there may be a bonus: not one, but even two or three mirrors! Plus all sorts of other things.

If the “screws” (the slang name for a hard drive) are like this (from a similar company), then it will be easier for you; you only need Phillips and straight screwdrivers, they are usually found in every home. I don’t know where, but I came across ALL hard drives from this company with cross mounts...

Like this

Unscrew the bolts and take a flat screwdriver (as a lever, so it’s better to be stronger)

We place a screwdriver under the lid and, turning it slightly, go around the perimeter. The lid is usually glued to something similar to silicone, so simply pressing the lever does not work well, especially since you can break something inside with a sharp movement.

Does not work? Is there something stopping you from opening it? Still would! Manufacturers are not fools:) there is always one or two. or even three hidden bolts under the stickers :) Feel with a screwdriver and you will find dimples that can easily be picked out with the same straight screwdriver. That's where I had it hidden :)
And another tip: when you unscrew the bolts, you don’t need to do it one by one, you need to loosen each one by half a turn or a turn and only then unscrew them completely, otherwise it may turn out that the last one or two cannot be unscrewed due to the skew of the lid. Also IMPORTANT: when the bolt does not want to come off, you do not need to turn it with force - this way you can scratch out either the screwdriver or the hole. You need to press the screwdriver with almost all your weight perpendicular to the product, and while pressing, lightly try to turn it. The harder you press, the better. I even had to unscrew fasteners that my husband couldn’t unscrew =) The main thing here is technology and accuracy, not strength =) Although strength is still needed, if your hand is tired, it’s better to get to work in a couple of hours, when your hand has rested.

So, we did it all. And what beauty is inside the lid! Everything sparkles :)
Someone will decide that beauty is needed to admire it and will leave everything as it is, but I’m greedy :) Therefore, I’ll analyze it further.

Now you need to untwist the top elements one by one. It's better to start with a magnet and a "prickly thing." And as a warning, when unwinding, use the method I described above, since in the middle everything is usually screwed on very tightly and you can ruin the whole thing.

After the magnet is unscrewed (sometimes, by the way, it is not screwed in at all, but simply fixed on the protrusions in the case), we remove the upper part of the magnet with the same lever screwdriver, just be very careful, it can become magnetized back and knock off your fingers! The lower part of the magnet (most often it is not a magnet, but just a piece of iron) can also be screwed on, or can simply be easily removed after removing the magnet

Now it comes to the mirror. There are many difficulties here:
first - the element rotates and you need to hold it tightly and press down to unscrew all the bolts
second - it is very easy to scratch the mirror with a screwdriver, and then these scratches will not be pleasing at all
and the third - according to the law of meanness, if you don’t follow the rules that I described above - the last bolt ALWAYS turns out to be tightly screwed... here you already have to tinker, rest and tinker again (after all, for the first and second reasons you need to unscrew it carefully)
BUT the result of greed is always the same: after all, everything gets promoted and very interesting and beautiful things are obtained: in the photo there is a ring with holes...

The mirror itself (here you should rejoice and clap your hands - especially if there are several mirrors)
By the way, now do you understand why it is called “hard drive”?
The disk must be removed carefully by moving the little thing to the right (I call it a mouse, I’ll explain why later)

When all the mirrors have been removed and the joy has subsided, you can unscrew the motor (located under the disk) and the “mouse”. The “mouse” can simply be removed from the base upwards, or it can be screwed on.

I don’t know, maybe it’s a bad photo, but in this circle in the middle there is a depression. You're lucky if, in addition to the recess, there is a transverse slot - this means you can unscrew this cylinder with a regular straight screwdriver. I was unlucky - and therefore we take a closer look at the recess, or rather at its shape. For me it’s a hexagon - which means I take it from a set of screwdrivers (there is also a set of wrenches - men should know) approximately suitable in size and twist.

That's it! Only now I realized that I never took a photo of the “mouse”:(((But I think if you look at the other photos (and especially if you look at it yourself), you will understand why this is so. When the cylinder is removed, you get something like an “eye” "mouse. And the sharp end is its nose. Some old hard drives used colored wires, and when I tore the cable of the “spiky thing” from the mouse, funny antennae wires stuck out at the tip of its nose :) That’s why the “mouse”
Let's return to our trial. This is what we ended up with. This thing can be used in different ways: as a hammer :), as an ashtray (you just have to screw the motor into place and cover the holes with something), or it can be used in some other way, I think you shouldn’t have any problems with its use.
But first we need to turn it over and unscrew something no less valuable to us.

We unscrew 4-5 bolts (I think an intermediate photo is not needed) - and lo and behold! In addition to the cool circuit (from which, if necessary, you can remove the microcircuits, or use it as your own decoration), we also have a miracle foam rubber. It’s a miracle, because it is unique in density, softness, etc. It was from this that I made the pupils for my felted dragon, but you can cut out anything you want! Sometimes the foam rubber is covered with film on one side, and sometimes without it. If the hard drive is very old, the foam rubber is uninteresting, and most often burnt here and there.

Here are our riches :)
By the way, maybe your imagination can tell you WHAT can be made from bolts? I already have a SEA of them, in different sizes and colors... maybe your imagination will tell you? :)
Below I provide more photos of possible disassembly options based on the example of other hard drives

You just need to pry a piece of metal and peel it off a little from all sides, the glue, as you remember, is like silicone and it stretches. The main thing is not to bend

This time there was another surprise in store for me - a metal ring under the lid. At first I thought it was a magnet and was happy, but the magnet effect created a very tenacious glue.

You can disconnect the circuit immediately, even before disassembling the entire “screw”. Especially when it is attached with a cable that can be accidentally torn if done the other way around.
The train comes out easily, just pull it.

This is the advantage I talked about when I pointed out the thickness of the hard drive. Here the top cover turned out to be very roomy, and there are only two holes in it (they can either be sealed or the same bolts can be screwed in), this is an ideal ashtray :) or a container for small items... you decide.

Things that fail are not always trash. You just need to figure out how to replace their intended purpose and use it in a new way. For example, an old hard drive. At first glance, it is a waste material that must be recycled. But if you look closely, you can find many creative ideas for its further use.
Watch
If you get creative, you could end up with a table clock that resembles a classic mechanical clock. You only need to spend very little for all this beauty. In addition to the hard drive, you need to stock up on screws, a screwdriver, superglue and a heat gun. You will also need a drill and a drill bit. The hard drive is disassembled and all elements are removed from it.
To make the product not only functional, but also beautiful, surround the plate with LEDs. A strip of LED strip is attached to the chamber wall using super glue.
Grinder
In order to make a sharpening machine, you need to take a screwdriver and sandpaper. The manufacturing method is really very simple. All unnecessary components, represented by magnets, are removed from the disks. This is done using a screwdriver. Afterwards the disk is removed, and a circle is cut to its size.

Important! Power is not provided by a regular outlet. You will need a power supply. In order for it to start without a motherboard, you need to cut off the copper wire and plug it into the connector, connect it to the black and green wires.
At the end, the emery wheel is glued to the disk, fixed and connected to the power supply.
Portable storage
A portable storage device is simply made from a hard drive. To do this, take a container and place a hard drive in it. For designs larger than 2.5 inches, you will need to buy a power adapter.

A working hard drive can be used as a cloud server. This requires a single-board computer and the skill of even a novice IT specialist. The end result will be a device that will provide access to all computer data from gadgets connected to one Wi-Fi router.

Hard drives contain an element called neodymium magnet. It is quite large, so it can attract a lot of different things. With its help, you can create a stand that will hold knives in the air. To do this, you will have to take a bar, a magnet, glue and simple tools such as a screwdriver and a knife.

Wind chimes
One of the cute things you can create from a disc is a doorbell. Before this, you can take the disks, the case, the usual fastening ring made of metal, and also the cord. Put all this together and you get a real work of art.

Secret safe
In standard small-sized apartments there is not enough space to install a secret safe for jewelry or money. But you can make such a useful thing with your own hands from an old hard drive. It is necessary to remove the components from its body, and then attach the cover with a small bolt to the corner. The container will open by turning.

For this device, in addition to the hard drive, you need to take a basin, make a hole in it, stock up on a lid from a tin, the tin itself, and bicycle spokes. First you need to make three holes in the disk on the lid. Next, the bicycle spokes are soldered to the resulting device, and a kind of box is made from the can. The lid is connected to the structure, the middle is removed from it. You can pour fuel into the hole. All this is placed in a basin and sugar is added. At the end, the alcohol is ignited and the disc is turned on.


Flash drive
If you want to surprise your friends with an interesting and unusual gigantic flash drive, you can use an old hard drive. First you need to remove the mounting screws with the disk and cover. Next, select a USB splitter that is suitable in size. It is attached to the place of the central disk, and the connection is lubricated with superglue. At the end, a flash drive is attached and the lid is assembled.

Have you purchased a new, fast solid state drive (SSD) and your old one is sitting around? Give it a new task and use it as an external data storage device. To do this, you only need a case with a SATA controller; it is available for both 2.5-inch and 3.5-inch models. The latter require a power supply, while compact drives have enough power supply via a USB port.
Labor intensity: average, costs: 600 rubles.
Mini NAS on the router
 In all home network do you need access to the same data? You don't need expensive and bulky network attached storage (NAS) for this - this task A USB stick can do this if it's connected to your router. Newer devices are equipped with a corresponding port.
First you need to format the USB drive from Windows OS in file system NTFS and then just connect it to the router. Moreover, the latter must have USB port and it must support the corresponding functionality. Now, typing 192.168.1.1 (or similar) into your browser's address bar will take you to the router's user interface.
Go to the USB Settings | General access to the storage device" (for TP-Link routers, for other devices the names of menu items may differ) and make sure that the disk starts.
To access data on your home network, you will only need to type an address like “\\192.168.1.1\Volume1” in Windows Explorer. Permanent connection achieved with a click right click mouse over the folder to which you plan to allow access, and selecting “Map network drive”.
Labor intensity: low, costs: no
Flash drive instead of password
 A small USB flash drive also has practical applications. For example, when you log into Windows, you can unlock your computer without entering a password. To do this, you will need the Rohos Logon Key tool (1450 rubles), Predator (650 rubles) or the free USBLogon (http://www.rohos.ru/products/rohos-logon-free/).
 After installation, you need to select the connected USB drive and configure security settings. After entering Windows password The flash drive is ready for use. Unfortunately, working with USBLogon is complicated by the German-language interface, but even without knowledge of German it is easy to understand.
Labor intensity: average, costs: no
Flash drive for emergencies
 When your computer no longer works the way it should, a bootable USB flash drive comes to the rescue. The Sardu tool (http://www.sarducd.it/) installs up to 20 different antivirus programs on the drive, and also provides different versions Linux and other first aid software.
> Preparation: in the left sidebar the selected software is listed by category. Check the boxes next to the required programs. We recommend choosing several antiviruses and a version of Linux (for example, Ubuntu).
> Creating a flash drive: On the right sidebar, click on the USB drive symbol. You can start creating bootable flash drive.
> Emergency use: To use a bootable flash drive in the event of an “accident”, you need to change the boot sequence from drives in BIOS Setup.
 In this case, you should set the boot priority from USB to HDD. Then select the required program from the list. Don't forget to undo changes to the BIOS after "repairing" your computer.
Photo: manufacturing companies, racum/Flickr.com
Hi all! Actually the idea is not new. They say the Internet is full of such records, I haven’t seen it yet, the idea appeared on its own. I had the urge to, you know, urgently sharpen a knife and a screwdriver... But “OH GOD!” The sandpaper is in the garage, but at work there isn’t even a file... Well, we are “sysadmins”, simple people, and I went into the “bins of the Motherland” and took out... An old hard drive from a PC...
We take scissors, screwdrivers, sandpaper, our HDD and double-sided tape
Everything we need.

Unscrew the bolts. The 7th bolt is always hidden under the sticker.

……………………………………………………………….
Let's open it. and everything is so beautifully packaged there. glitters.

We unscrew the head drive and the head movement lever, magnets for experiments, the rest can be scrapped.

Unscrew the disk mounting cover and remove the washer above the disk, as well as the disk itself

Place the disc on the sandpaper, trace the contours and cut out

These are the bagels you get)

We glue double-sided tape onto our disk (you can also add glue to it, but it will be easier to replace the sandpaper with tape)

……………………………………………………………………………………
SPARK))))
Well, about the operation of this device.
It is better to use fine sandpaper; the engine is rather weak for coarse ones. But I had enough for sharpening everything I needed, even a lot. Bye everyone!