Installing drivers on a laptop. How to install a driver on a laptop? How to install drivers from disk How to install drivers on a new Windows
Many users are faced with the need to configure the operating system using drivers. These are special programs that are used to interact between hardware and the operating system. They allow you to listen to music, play video files, and launch various applications on your device. If you encounter problems using devices, then you need to read the information on how to install drivers on your computer.
Why are drivers needed on a Windows computer?
Each hardware component that interacts with a computer is equipped with a driver. They are needed for:
- chipset motherboard;
- sound card;
- network card;
- video cards;
- controllers responsible for the interaction of disks and other devices.
It is necessary to install software components for the operation of devices, starting from the control circuit of the main board and ending with utilities for the interaction of controllers.
How can I check which drivers are needed?
By default, the operating system already contains the necessary set of drivers to run, but they may be outdated or partially inoperative. Therefore, after installing a new version of Windows, you need to check for working versions of drivers and download them. This can be done as follows:
- Go through the main menu to the “Control Panel”. Find the "Device Manager" line and click on it.
- You will see a list of all computer equipment. For convenience, it is organized into sections.
- Check each partition for any uninstalled components. They are marked with a yellow question mark. In some operating systems oh they are marked in black exclamation point, placed in a yellow triangle. The appearance of such a sign means that no drivers were found when Windows installation or their version is excessively outdated.
Now all you have to do is find the missing components and install them on your device. To do this, you can resort to the help of disks, Internet sites, Update Center and utilities. Let's look at each case separately.
WITH motherboard and video cards always come with disks containing all the drivers necessary for their operation. Installing the driver from the disk is carried out according to the instructions:
- Place bootable media to the optical drive. Wait for the boot menu to appear and select “Run Autostart”. This item appears first in the list and may have a different title. If the start menu is not displayed, then you need to start the installation through “My Computer”. To do this, select the drive icon and right-click on it. From the drop-down list, select “Open” or “Install”. The third option is to open the disk through Explorer by double-clicking on the left mouse button, select the one with the exe extension from the list of files.
- Typically the disk contains a complete set of drivers. He will appear in front of you on the list. First install the Chipset drivers. The installation procedure is standard; you need to agree to the terms of the license and confirm your actions several times. Do not change the folder for downloading the software, the system will select the one you need.
- Reboot your computer, then install software Audio and LAN in a similar way. This will enable the audio and network components of the motherboard. After every boot, you need to restart your device to avoid errors.
There is no need to install other programs and utilities that may be on the disk - the software for the chipset, sound and network cards is enough. If, after installing them, you find unidentified devices in the manager, then you need to look for components for them separately.
Drivers are installed in the same way if they are needed for a video card or a standard video controller. A disc with software, if the video card is not standard, is included additionally.
How to download and install drivers on a computer from the Internet
If you purchased a motherboard a long time ago, then the software for it is already outdated and it may not be displayed correctly in the manager. The latest version can be downloaded from the hardware manufacturer's website. To do this, you must already have a program for setting up a LAN installed, or you can use a USB modem (a smartphone can be an alternative to it).
Before installing drivers on your computer, you need to find out who manufactured your motherboard. You can act through the “Device Manager”. Then you need to go to the website, its address looks like the name of the manufacturer and the prefix com/ru. On this portal, you need to select your board model (usually the software is located in a section called “Service” or “Support”). Since the range of boards can be large, it is better to use the search bar. Enter the name of the board into it as indicated in the “Device Manager”. If you need drivers for a video card, then the search for them is carried out in a similar way.
Then you only have to select the operating system model and the missing utilities - for the chipset, sound and network cards. Now all you have to do is click the “Download” button and wait to receive the file. The solution to the problem of how to install a downloaded driver on a computer depends on the form in which you receive the desired program. If this is a standard exe file, then just double-click the left mouse button to launch it. If you received the utility in an archive, you first need to unpack it; for this you will need to additionally download or install it from DVD program WinRar or 7Zip. The installation algorithm is no different from what is given for downloading utilities from disk.
If you could not find the necessary drivers on the manufacturer's website, then you need to contact the chipset manufacturer. In this case, you need to act similarly, but enter the chipset model in the search bar. Sound drivers and network card in this case you will have to search manually.
How to find drivers for your version of Windows OS?

Sometimes the previous search options do not allow you to find what you need. This is due to what you put new version An OS for which the manufacturer has not yet prepared a utility package, or you are using an outdated version that lacks support. In this case, you can proceed as follows:
- use Center Windows updates;
- download utilities for the previous OS version;
- use special utilities;
- manually install the required software.
Let's deal with the most in a simple way– use of standard operating system software – Windows Update. It will help you install utilities for the normal operation of network and audio equipment. To work with standard features, follow the algorithm:
- Go to the "Hardware and Sound" menu.
- Right-click on your PC's name and find "Device Installation Options" in the drop-down menu.
- In the window that opens, place a checkmark next to the phrase “Use Update if drivers are not found on the computer.” Save your change.
Now the operating system itself will search for and update drivers. However, this method is not good enough, as errors often occur. Sometimes it is better to install an additional utility on your PC that will help it quickly install and update all the necessary components.
Utilities for the previous OS version are downloaded from the manufacturer's website. First you need to study the compatibility of the software: Drivers from the “seven” are suitable for Windows 8 and 10. Windows 7 itself works adequately with those designed for Vista. The only thing you need to consider when searching is the system capacity. You cannot install components designed for a 32-bit system on a 64-bit one.
Popular utilities for searching and updating drivers
If you don’t want to surf websites and look for individual components for system interaction, you need to install one of special programs. Automatic installation of drivers is performed by one of the utilities:
- DriverPack Solution - this application contains a large collection of drivers for systems with different configurations. For home use, it is recommended to use the online version of this program, but it will only work if you do not have network problems. If you often work with a computer that is not connected to the World Wide Web, you should turn to the offline version, but you will have to download it and install it on a flash drive with a capacity of at least 12 GB.
- Snappy Driver Installer is a popular utility from one of the developers of DriverPack Solution. Available in two versions – Lite and Full. There is no need to install it. The first version of the utility searches for and installs drivers from the Internet, and the second can be downloaded to an external HDD (its capacity is more than 30 GB).
- Driver Booster is chosen by fans of computer games, who are often faced with the fact that the installation asks for a driver. This is a truly automated utility that scans the system and installs missing components in one click. The developers claim that the software components installed on your PC have been improved to improve system performance, which is very important when playing games.
- Driver Genius – has a trial period of 30 days. It's good for regular use, but the license will cost around $30. It has a driver package backup feature, useful for those who frequently reinstall the system.
- Driver Checker – will cost you about $40, but it contains several useful functions: backup, restore, delete faults, export software components from other devices combined into one local network. This program was the first to be optimized for Windows 10. The disadvantage of the utility is that it does not have a full trial period. Without payment, it only reserves drivers.
- DriverMax Free is an English-language application that can not only update the software, but also create a starting point for system recovery. This software is free, but then you need to use it manually; if you want to fully automate the process, you will have to pay about $11 per year for a license.
- Driver Magician is an English-language utility that has a trial period of 13 days. It can back up not only drivers, but also individual user folders, for example, “Documents” and others.
The listed applications deserve best reviews from users. They are compatible with any version of Windows and easy to use. In addition to them, you can resort to the help of other programs that are no less simple. Even a beginner with minimal knowledge of working with a PC can cope with updating and installing software using utilities. After completing any of the listed programs, you need to reboot the system to save the changes made to its operation.
Manually searching and installing drivers on your computer

The most difficult task is the forced installation of software components, done manually. You should resort to it if an error occurs when installing the driver using other methods. Follow the algorithm:
- Go to Device Manager and find the device that failed to install the software.
- Right-click on it and find the “Properties” item in the drop-down menu. He usually goes last.
- Go to the “Details” tab in the window that appears.
- In the upper selection field, stop at the “Device ID” item.
- A line with a set of characters will appear in front of you. Copy it.
- Go to any site that offers to find drivers or paste the copied value into search bar.
- From the search results, select the site that offers to download drivers for your version of Windows. Download the required archive or exe file, install it in the same way as drivers from the official equipment manufacturer.
In some cases, alternative services offer components without an executable file. In this case, the installation will proceed differently. Go to Device Manager again, right-click on the unidentified device and select Update Driver. In the next window, place a marker on the line: “Search for drivers on this PC.” Specify the path to the desired file in your downloads folder. The operating system will do the rest for you. A reboot is required after installation is complete.
Now you know how to install the necessary drivers. This is not a complicated procedure that will allow you to use all the capabilities of your PC. Share the information you receive with your friends, comment and tell your stories.
A driver is a special program that is necessary for each device to interact with a computer. Such devices include the chipset (control circuit) of the motherboard, sound card, network card, video card, disk controllers, etc.
Windows contains many drivers for various devices required for the initial installation and launch of the operating system. But they are usually simplified and outdated, and some modern devices and are not detected and do not work at all. Therefore, after installing Windows, the first thing you need to do is install all the necessary drivers.
Hard drive Transcend StoreJet 25M3 1 TB2. Installing drivers from disk
The easiest way to install drivers is from the motherboard disk that came with the computer when you purchased it. Place the disc in the drive and wait until the installation menu appears. In Windows 7 and higher, startup confirmation may still be required installation program from disk.

If the menu does not appear, then right-click on the disk in Explorer and select “Install or run a program from media”, “Open Autorun...” or something similar.

You can also open the disk in Explorer and independently run the file “Autorun.exe”, “Setup.exe”, “AsusSetup.exe” or similar.

But the previous method is better, since the system itself will launch the correct file.
The installation menu may look different. We are interested in drivers for the chipset, sound card and network card.

The first step is to install the drivers for the chipset and restart the computer. Then you can install the remaining drivers. If you are not in a big hurry, I recommend restarting your computer after installing each driver. If you are in a hurry, then reboot after installing the driver on the chipset, and then install everything without rebooting, in most cases everything will be fine.
There may be many more different programs and utilities on the disk, but usually they are not particularly necessary and they only slow down the computer. Therefore, I recommend installing only what you really need and know how to use it. It’s better to first look for information on the Internet about why this or that program is needed. Some of them are designed for overclocking and can harm your computer if used incorrectly.
3. Download drivers from the motherboard website
If you don’t have an installation disk or you bought your computer a long time ago and the drivers on the disk might be outdated, then the best option is to download drivers from the motherboard manufacturer’s website.
If your computer is connected to the Internet by cable or via Wi-Fi, then you should already have a driver for the network card or Wi-Fi adapter. Download this driver in advance, because if Windows does not have a driver for the network card, you will not be able to access the Internet.
If you connect via a USB modem, then drivers are usually installed automatically when you connect the modem to the PC or from the included disk.
Please also note that drivers can be large (up to 1 GB), so you might want to download them all in advance, especially if you have a slow Internet connection.
So, we installed Windows and immediately go to the motherboard manufacturer’s website for drivers. On the site you need to find the “Service”, “Support” or something similar section. But so that you don’t have to search for a long time, I have compiled a list of addresses that will immediately take you to the desired section. You can download this list in the “” section.
After going to the site, enter the exact model of your motherboard in the search field.

The model is indicated on the box and on the motherboard itself. You can also find out the manufacturer and model of the motherboard using the “CPU-Z” program, which you can also download in the “” section.

After the model is found on the manufacturer’s website, you need to go to the “Downloads” or “Drivers” tab and select the version and bitness of Windows that you are installing.

A list will appear in front of you, which will contain many different files.

Everything related to your motherboard will be here. This includes BIOS and user manuals and various utilities. But we are primarily interested in drivers for the chipset, sound and network card.

There may be several driver versions, check the date and download latest version for each device, they are usually at the top. In this case, all drivers have only one version. Moreover, there is no separate driver for the network card, which means that it is included in the driver package for the chipset. There is a separate driver for the sound card and an AHCI disk controller driver. The AHCI driver needs to be installed only if the appropriate one was selected in the BIOS when installing Windows.
AHCI drivers have a positive effect on the stability and speed of the disk, but if your computer is still not fast enough, install it and your system will become much faster and more responsive!
Hard drive A-Data Ultimate SU650 120GBThen you simply download the files and if they are in a ZIP archive, then unpack and run the executable file. If the driver was already in the form of an executable EXE file, then you can run it immediately. Drivers are installed in the usual sequence. First the chipset driver and reboot the computer, then everything else.
4. If there are no drivers for the required version of Windows
If the motherboard is old and it so happens that there are no drivers for the required version of Windows, then there are several ways:
- search for drivers on the chipset developer's website
- installing drivers using Windows Update
- installing drivers from a previous version of Windows
- installing drivers using special utilities
- searching and installing drivers manually
5. Search for drivers on the chipset developer’s website
You can try to find a driver for the chipset on the websites of their developers Intel, AMD, nVidia. What chipset you have can be found on the motherboard manufacturer’s website or using the “CPU-Z” program, which we have already discussed.

On the chipset developer's website, the driver is searched in the same way as on the motherboard website. Links to the necessary sections of chipset developer websites are in the “” section.
5.1. Finding drivers for the Intel chipset
Select everything in the search form as indicated below and click “Search”.

In the search results window, select Drivers and the version of Windows you are installing.

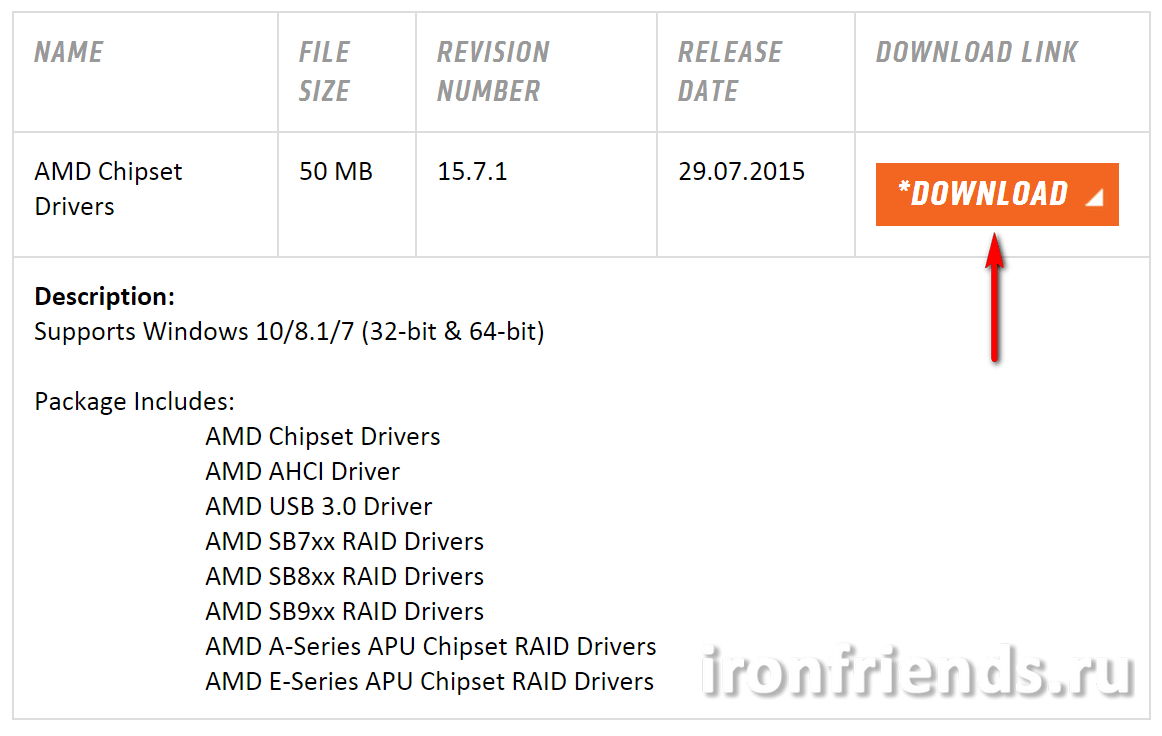
Download and install the latest version of "Intel Chipset Driver Update".
Select your chipset series and click “DISPLAY RESULTS”.

In the search results window, make sure that these are drivers for your chipset and click “DOWNLOAD”.
5.3. Finding drivers for the nForce chipset
The nVidia company produced chipsets under the nForce brand and there are still quite a lot of computers with such chipsets. If this is your case, then go to the nVidia website, fill out the form and click “SEARCH”.

Let me remind you that you can determine which chipset you have using the “CPU-Z” program (see point 5). If for some reason you find it difficult to do this, then automatic detection your chipset, use the “MOTHERBOARD DRIVERS” button in the form shown in the screenshot above.
Make sure you have the correct drivers, download and install them.

6. Installing the video card driver
After installing the drivers for the chipset, I advise you to first download and install the driver on the video card. Thanks to this, a screen resolution that is convenient for further adjustment will be established and the system will start working faster. Links to sites where you can download drivers for video cards are in the “” section.
If you have a GeForce video card, then go to the driver download section on the nVidia website, indicate the model of your video card, the version of Windows and click the “SEARCH” button.

Once the driver is found, click the "DOWNLOAD NOW" button.

Wait until the file is downloaded and run it. The installation is quite simple, you only need to click the “Next” button a few times.
If you have Radeon video card, then go to the driver download section on the AMD website, select the series to which your video card belongs, and download the driver for the desired version of Windows.

If you have more old video card and it is not in the list, then use the search on the AMD website. After downloading the file, run it. The installation is quite simple, you only need to click the “Next” button a few times.
7. Installing drivers using Windows Update
It happens that the motherboard manufacturer’s website does not have drivers for the sound and network card for the required version of Windows. But don’t rush, if the sound and Internet work fine, it means Windows has installed its own drivers for them, and in this case it’s better not to touch anything.
If something still doesn’t work, you can try installing the missing drivers using Windows Update. To do this, click on the START button and go to the “Control Panel\Hardware and Sound\Devices and Printers” section. Right-click on the icon with the name of your computer or laptop and select “Device installation options.”

Set the radio button to “Install drivers from Windows Update if they are not found on your computer” and click the “Save” button.

After this, the operating system will begin searching for missing drivers on the Internet and, if found, will automatically install them.
8. Installing drivers from a previous version of Windows
If you were unable to find drivers for the required operating system, then you can Windows systems 8 try installing the driver from Windows 7, and for Windows 7 you can install the driver from Windows Vista. In most cases they are compatible, it is only important to maintain the bit depth (x64 to x64, x32 to x32). These drivers need to be downloaded from the motherboard manufacturer’s website, which we have already discussed.
9. Installing drivers using the DPS utility
If you were unable to find and install drivers for a device or your computer is too old, you can try to do this using the special “Driver Pack Solution Online” (DPS) utility. You can download it in the "" section.
This utility determines what devices you have, the version of the operating system, downloads the necessary drivers via the Internet and installs them. Launch the utility and click “Install manually”.

I think this option is better, since it will allow you to abandon drivers that have already been downloaded from manufacturers’ websites and installed on the system. You can also disable the installation of unnecessary additional programs.
Check the boxes only for those drivers that you were unable to install in other ways. For example, I selected a driver for a sound card.

Go to the "Software" section and you can select additional programs that you want to install. This is, in principle, convenient if you have just reinstalled the system and do not yet have the most necessary programs. I have ticked the programs that I consider useful and recommend for installation.

After that, click the “Install All” button and the utility will install all the drivers and programs you selected.

10. Installing drivers using the DPS driver pack
A driver pack is a collection of drivers for a large number of devices. If you often encounter installing drivers on different computers or have a slow Internet connection, you can download full version"Driver Pack Solution" on a computer with fast internet, and then use it to install drivers on any computer.
The disadvantage of this solution is the large size of the driver pack (about 10 GB). Thus, to use it on various PCs you will need an external HDD or a flash drive with a capacity of 16 GB or more.
Sandisk Cruzer
11. How to check if all drivers are installed
In order to check whether all the necessary drivers are installed, you need to go to the “Device Manager”. This can be done in several ways.
1. Right-click the Computer icon on your desktop or START menu and select Manage.

Then go to the "Device Manager" section.

2. Click the START button and go to Control Panel\Hardware and Sound\Device Manager.

The first method is simpler and faster.
If there are icons with an exclamation point in the Other Devices section, it means that the driver for this device is not installed.

If icons with an exclamation mark are in other sections, this means that the driver is installed, but it probably did not fit and the device does not work.
In such cases, you will need to find and install the driver for these devices manually, which we will discuss next.
Go to Device Manager, right-click on the problematic device and select Properties.

Go to the “Details” tab, select “Equipment ID” in the “Property” field, find in any line the device identifier in the format “VEN_xxxx&DEV_xxxx” or “VID_xxxx&PID_xxxx” (instead of “xxxx” there will be 4 characters).

Write down this data or right-click on any line and click “Copy”. Go to the “DevID.info” website and enter the device identifier in the search bar and click “Search”.

Select your version of Windows and click on the name of the found device driver or the floppy disk icon.

Two driver formats are often offered - a repackaged “devid.info” file and an “Original file”.

If you have fast Internet and are not in a hurry, then it is better to download the “Original file”, as there are fewer problems with its installation. If the Internet is slow or time is running out, then try downloading the repackaged “devid.info” file.
If you downloaded the driver in a ZIP archive, extract all files from it before installation. If the driver is downloaded as an executable EXE file, you can immediately run it for installation. The installation is quite simple, you just need to run the executable file (such as “Setup.exe”) and click the “Next” or similar button several times.
If the driver does not have an executable file, you will have to install it manually. To do this, in Device Manager, right-click on the device for which you downloaded the driver and select “Update drivers...”.

Then “Browse for driver software on this computer.”

Click the "Browse" button, specify the folder where you unpacked the downloaded driver file and click "Next".

If a suitable driver is found in the specified folder, it will be installed and the device should disappear from the list of unidentified devices in the device manager.
13. Rollback or uninstall the driver
Sometimes it may happen that the driver you installed does not work or works worse. For example, background noise or clicking noises appeared after installing the driver on the sound card. In this case, you can roll back the driver to a previous version or remove the current driver from the system.
In order to roll back a driver to a previous version, go to Device Manager, right-click on desired device and select Properties.
In the window that appears, go to the “Driver” tab and click the “Roll Back” button.

If the “Roll Back” button is not active or rolling back the driver did not help, then you can try to remove the malfunctioning driver. To do this, in the same window you need to click the “Delete” button and confirm the removal of the driver.

After this, restart your computer and the system will again try to find and install the most suitable driver for the device. If the device does not work, try finding and installing another driver using one of the methods we discussed.
14. Do I need to update drivers?
Manufacturers periodically release updated versions of drivers that fix bugs and improve compatibility with other devices and software.
Some enthusiasts like to constantly update their drivers to the latest versions. But, if you are not a sufficiently experienced user and your computer is working fine, then I do not advise you to do this. Since some problems may appear with updating drivers, and you may not have enough experience to fix them yourself.
The only driver that is recommended to be kept up to date is the driver for the video card, as it adds support for new games and improves performance in old ones. However, also don't rush to update it if all your games are working well. Because games during development are always tested on older drivers, and their new versions can cause a drop in performance. Update the driver for your video card if you have problems with some games.
15. Other drivers and installation methods
Drivers for other devices can be found on their manufacturers' websites. If you know others good ways or programs for installing drivers, share them in the comments!
16. Links
Below you can download all the files that were mentioned in the article.
After installing all the drivers, I recommend doing it again on an external drive. This will help you quickly restore the system with all drivers in case of a failure.
Transcend JetFlash 790 8Gb
Hard drive A-Data Ultimate SU650 240GB
Hard drive Transcend StoreJet 25M TS500GSJ25M 500 GB
Hello friends. In this publication below we will look at the question of how to correctly install drivers for computer components and peripherals in a Windows environment. But first I want to offer you a list of links to all possible publications on the site that relate to the topic of searching and installing drivers. These articles address, in particular, the following issues:
- How to identify an unfamiliar device on your computer and find drivers for it on the Internet;
- How to install drivers correctly;
- How to install drivers automatically using special programs;
- How to make your own driver assembly;
- How to save or transfer drivers to another operating system.
Website publications about drivers
How to install drivers correctly
One girl decided to buy USB bluetooth adapter for connecting the phone to the computer and didn’t bother to ask the seller if it works with that Windows version, which is installed on her computer, and she has Windows 7 Home Basic installed. It turned out that the USB bluetooth adapter is designed to work only with Windows XP; drivers for this adapter for Windows 7 simply do not exist, so we resolved the issue by replacing this device.
What is the point of this whole story, but the point is that we must know for sure whether our device is suitable for working in the operating system we have installed or, in other words, whether our device has drivers for working in the operating system we need. You can only find out on the official website of the device manufacturer and download the latest version of the driver we need, specifically for our OS, only there.
A large number of Users are very fond of automatic driver installation and, not surprisingly, it is the simplest. After installing a new device on the computer, the Hardware Installation Wizard tries to automatically install the device driver; if it fails, it warns us that there are problems with this device.
In this case, we must use the CD with the necessary driver included with the purchase of the device.
Installing a driver from such a CD usually goes without problems or any difficulties, many consider this option for installing the driver to be the most correct, but not you and me, usually such disks contain outdated versions of drivers therefore: It is correct to go to the official website of the device we purchased and download the latest drivers.Let's complicate the task for ourselves, for example, we purchased a video card and we don’t have the installation disk with drivers and the stickers have worn off, we don’t even know its manufacturer.
The Hardware Installation Wizard was unable to install the driver. To install all the information about our video card and find drivers for it, we go to Device Manager, right-click on My Computer, then select Manage and Device Manager. We immediately draw attention to the devices opposite which have a yellow circle with an exclamation mark, this means that the operating system did not find drivers for these devices and we will have to look for and install these same drivers ourselves. Under the yellow circle is the Video controller (VGA-compatible), right-click on it and select Properties, then go to the Details tab, in the drop-down list, select “Equipment codes (ID), in other words, this is how we find out the identification number of our video card.Here it is, just like in the top screenshotPCI\VEN_10DE&?DEV_0614&SUBSYS_061210DE&REV_A2. Now we find the video card driver by device code, through the resource www.devid.info. Everything on this site is very simple. In the input field, enter the “Equipment Code (ID)” of our device and click Search

And our driver is located
Click Download, but please note that this driver is for the operating systems VISTA, Windows 7, 32-bit, if you have Windows 7 64-bit, then this driver is unlikely to suit you, in this case, proceed to the second part of the article, where it is explained how to download the driver on the manufacturer's official website.
Choose original file and download it
Friends, the driver for our video card downloaded from the website devid.info/ru, unfortunately, will not have the latest version. To download the latest version of the driver, you need to go to the official website of the manufacturer of your device ( www.nvidia.ru ) and download it there. How to do this, read below.
Now we find the same video card driver using the device code via resource pcidatabase.com, here you can accurately identify any device and, accordingly, find drivers.
We look and see a set of letters and numbers, translating the symbols Ven - vendor - designation of the device manufacturer DEV - device, the four characters after these letters are the identification number of our video card.
We write out Ven - vendor, that is, the manufacturer of our device, the number is visible in the photo VEN_10DE , then we write out DEV - device, the device itself DEV_0614

Let's go to this site, then we need to insert the written device codes into the Vendor Search search field: 10DE , then in the Device Search field: 0614, click Search

And here it is, our NVIDIA GeForce 9800 GT video card.

How to install drivers on Windows 10, Windows 8.1, Windows 8, Windows 7, Vista, XP?
What is manual or automatic installation drivers?
We will try to explain in a language that everyone can understand, without abstruse phrases and complex terms! The principle of manual, simple or automatic driver installation for the above operating systems is the same.
So, let's begin!
Automatic driver installation
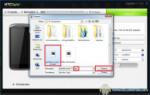
You downloaded the driver from the site, it can be either in the form of an arj, zip, rar archive (simple archive), or in the form of a single file with the exe extension (self-extracting archive). A self-extracting archive (example installdriver.exe) is a startup file that already stores compressed files that do not require third-party programs for unpacking; you just need to run it, point to an empty folder on your disk that you created in advance, and the archive itself will unzip the drivers there.
A simple archive arj, zip or rar - in this case you also need to create an empty folder on the disk in advance and unzip all the files from the archive there, unzip it and not just run the archive, the fact is that often many novice users, after downloading the archive, just open it through “Start” or “Run”, while the archiver program simply shows the contents of the archive in the form of a list of files and any attempts to run something from the archive will lead to an error, so remember that the first thing you need to do is unpack the archive into a separate empty one you created folder, for this in the archiver program (for example WinRar) there is a button “Extract to the specified folder” or “Extract to” after which you simply indicate where to unpack the archive and wait for unpacking.
Now comes the most important part!
You unpacked the archive into a folder you created in advance, went into it and saw the file setup.exe or install.bat or any other startup file with a different name, just run it and the installation program will do everything itself, you just have to reboot the PC (if the installer does not will do it himself) and enjoy the working device.
Now let's consider the option when you unpacked the archive into a folder you created in advance, went into it and saw an incomprehensible set of several files with the extension inf, ini, sys and others, while starting exe files or there is simply no bat. This may be the case, the fact is that it is often difficult to find drivers for some devices on the manufacturer’s website, especially if it is already outdated, and you have lost the installation disk for the device for a long time or maybe it never existed at all, in this case, help resources come that have a rich library of old but current drivers where they are usually stored in this form, that is, the downloaded archive will not contain any installation programs, but only the files of the driver itself, which we now have to install.
Manual driver installation
We have a folder with several files. What's next?
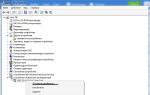
1.Go to "Device Manager"
2. We look in the list for the necessary equipment for which you actually downloaded the driver; as a rule, a non-working or incorrectly working device is placed with an exclamation mark, which is difficult to miss.
3.Click on the device with the left mouse button, highlighting it, then click right button mouse - a menu will open, select "Update drivers"
4. A large window will appear “How do you want to search for device drivers”

5.Selecting the top item " Automatic search updated drivers" Windows itself will find on the network (though not always) the driver needed for the device, this is "automatic driver installation". But we need to install the driver we have already downloaded from our folder, so we select the bottom item "Search for drivers on this computer”, after which the “Search for drivers on this computer” window will appear, everything is simple here, click “Browse” and look for your folder where we threw those downloaded drivers with incomprehensible files;), as a result, in the window we have the path to the folder with the files , click “Next”, now Windows will do everything itself and, if necessary, restart the system.

That's basically all, we sincerely hope that this little article will help you install the driver you downloaded and necessary equipment will work great and make you happy. Good luck to you friends and let everything work out!
Regardless of the hardware version for which you are looking for a driver, you will need to find an updated driver for the device from the very beginning. It is best if this driver is located on installation disk, which was supplied upon purchase.
If the disk is missing, you need to find out the device model. It may be printed on the box or listed in the computer documentation. You can also find out the hardware version using the tools built into the system. Go to the Start menu and right-click on Computer. Select Properties, and then on the left side of the window, click Device Manager. Find the name of the hardware for which you want to install the driver, then go to the official website of the device manufacturer and find the correct software.
As a rule, all drivers are located in the technical support or downloads section.
Removing the old driver
Go to Device Manager and find the name of the device for which you downloaded the driver. After this, right-click on the corresponding line and select “Properties”. Go to the Uninstall tab to uninstall the software. Confirm the operation. After its completion, the standard Windows drivers or the device will be deleted (if they are absent). Now you can start installing the driver.
New drivers for video cards can be installed without first removing the device from the system.
Driver installation
Run the file you downloaded earlier and follow the instructions that appear on the screen. Accept the terms of the license agreement and wait until the files are unpacked for the device to operate. The operation may take several minutes, after which you will be prompted to restart your computer. Close all running programs, save your work, and reboot. If the driver installation was completed correctly, the device will be recognized in the system and will become available for use.
In some cases, the system will automatically update the required driver. To do this, you just need to click the “Update” button and select the appropriate option.
If the drivers for installation are supplied not as an installation file, but in an archive format, instead of removing the device from the system, you will need to select the “Update” item, by clicking on which you can specify the path to where the downloaded drivers are located. Once the operation is complete, restart your computer to apply the changes.