How long does it take to restore the system? Windows System Restore
If you switched to the new Windows 10, but for some reason you didn’t like it, you can roll back to the previous operating system that was previously installed on your computer. You can also roll back Windows 10 to factory settings or to one of the restore points if the system produces an error that you cannot solve in any other way.
Conditions for system rollback
There are two ways to roll back the system - reinstall it or restore it:
- the first method will require you license key, since the data that you previously had an activated system installed will be lost. When reinstalling, all information stored on the main disk partition will be lost;
- The second method is suitable for you if 30 days have not passed since the transition to Windows 10, since during this period the Windows.old folder is saved, which stores all the data necessary to restore the previous installed operating system. After a month has passed from the date of transition to the new operating system, the folder is automatically deleted, and the license from the previous system is finally transferred to Windows. That is, if you had licensed Windows 7, and you spent 30 days on Windows 10, then the tenth version will become licensed, and to install Windows seventh you will need a new license key.
Rollback before 30 days have passed
There are several ways to restore a previous version of the installed system from the Windows.old folder. First try the standard method and system recovery, but if they do not suit you, then use the second option - through a third-party program.
Standard method
- Open PC settings. Open computer settings
- Go to the "Update and Security" block.
 Open the “Update and Security” section
 - Select the “Recovery” subsection.
 Go to the “Recovery” subsection
 - This subsection should contain the item “Return to...”. The version you can revert to is the same as the one you installed previously. Click on the “Start” button and follow the instructions that appear on the screen.
 Click the “Start” button to start rolling back to the previous OS
Through recovery
- While at the “Login” step, when you need to select account, hold down the Shift key on your keyboard and select “Restart”.
 Hold down the Shift key and go to reboot
 - The recovery menu will open, select “Diagnostics”.
 Go to the “Diagnostics” section
 - Proceed to select advanced options.
 Let's move on to additional parameters
 - Select the “Return to previous build” block.
 Select the “Return to previous build” function
 - Select the proposed option - rollback to the previous installed system.
 Choosing where to roll back
 - Enter a password if you have one.
 Enter the password
 - Read the warning and confirm the action.
 Confirm the start of the rollback
 - Wait for the process to complete; it can last from ten minutes to several hours, depending on the performance of the computer and how many files need to be restored.
 We wait until the previous version of the OS is installed
Using a third party program
This method is worth switching to if you have a Windows.old folder with files from the previous system, but the “Return to...” section is not displayed in the computer settings. This happens sometimes, so you can follow these steps to use the files in the folder:
- The third-party program is an image official application from Microsoft - Rollback Utility. Download this image, which weighs about 200 MB, from the official Microsoft website, and then write it to any free flash drive. This can be done using the built-in Windows functions 10: click on the image right click mouse, select “Mount” and indicate on which media you want to burn the image.
 Select “Mount” to begin the mounting process
 -
 Press the Delete key to enter the BIOS
 -
 Go to the Boot menu
 -
 We put the medium first
 - Save the changes made to the BIOS and exit it; booting from the flash drive will begin automatically.
 Save the settings and exit the BIOS
 - When the program loads from the flash drive, go to Automated Repair mode.
 Select Automated Repair mode
 - Two systems will appear in the window: active and old. Select the one you want to roll back to and click on the Roll Back button. Instructions will appear on the screen, follow them.
 Select the system to which the rollback will be performed
After 30 days have expired
If you no longer have the Windows.old folder, then rolling back without reinstalling the system is impossible. Create installation media from the version of Windows you want to downgrade to by mounting the system image onto a USB flash drive. Boot from the created media and go through the installation process of the desired operating system.
 Install the system by uninstalling the previous version
 Please note that you will have to remove Windows 10 as you need to format the partition hard drive, on which the installation will be performed, which means that the license key will need to be entered again. If you want to save the files that you managed to acquire while using Windows 10, then copy them to third party media
, and after installation is complete, transfer them back to your computer.
System Restore
- System recovery is not a rollback to the previous operating system, but to the last restore point. Points can be created manually, but by default they are created automatically. They are needed so that if an unsolvable error occurs in the system, you can roll back all processes and computer settings to the moment when this error did not exist. To use the point, follow these steps:
 Launch your computer's Control Panel.
 - Opening the control panel Go to the "Recovery" section. Find him using.
 search string
 - Go to the “Recovery” section
 Run the recovery program.
 - Click the “Run System Restore” button
 If you have several points, then you can select the one recommended by the system, or any other, by proceeding to manually selecting a point.
 - Select a recommended or other restore point Wait while the system restores to automatic mode
 . Once the process is complete, you will receive a notification that the system has been restored successfully. Done, now all the settings and parameters of the computer correspond to the properties that it had at the time the restore point was created.
We go through the process of rolling back to a restore point
Video: Applying restore points
Via command line
 If your computer does not boot in normal mode, you can put it into safe mode with command line support, and then run the rstrui.exe command at the command prompt. Executing this command will start the recovery process, and all other actions will be the same as the normal recovery described above.
 Run the command rstrui.exe to start the recovery
If your computer settings have been changed for the worse, then you have the opportunity to roll back all settings to default values in a couple of steps:
- Go to computer settings by holding down the Win+I keys on your keyboard, or through the search menu.
 Open the Settings application
 - Open the "Update and Security" section.
 Select the “Update and Security” block
 - Open the “Recovery” subsection.
 Go to the sub-item “Recovery”
 - Begin the process of returning your computer to its original state by clicking on the “Start” button.
 Click on the “Start” button to begin resetting to default settings
 - You can choose one of two options: delete applications along with settings, but keeping personal files, or delete everything that is on the computer, leaving completely clean Windows with an empty hard drive.
 Choosing how to reset settings
 - Having chosen the rollback method, confirm the actions by clicking the “Reset” button. The reset process is performed automatically, wait until it is completed without interrupting the procedure.
 Click on the “Reset” button to start the process
Additional method
If the method described above gives you an error or does not allow you to reset settings for some other reason, then you can use a third-party program from Microsoft to achieve the goal:

Reset when the system is frozen
If, due to changes in computer settings, the system no longer starts, and because of this there is no access to computer settings, then you can recover without logging into the system, but for this you will need a recovery disk or bootable USB flash drive:

Recovery using the program
If the system encounters an insurmountable error, then you can restore it to its original state using a bootable USB flash drive and the official application from Microsoft:
- Download and run the application from the official Microsoft website designed for Windows installations 10 - Installation Media Creation Tool.
 Download the Installation Media Creation Tool program
 - After launching the application, select the version of the system installed on your computer.
 Selecting system image parameters
 - When choosing an action, check the option “Create an installation flash drive” and go through the creation process to the end.
 We indicate that we want to create an installation flash drive
 - Turn off the computer without removing the flash drive from the port, start the power-up process and as soon as the first signs of power-up appear on the screen, press the Delete button on the keyboard to go to BIOS settings. The key may differ, which one it will be in your case, depending on the motherboard model. But when the system boots, lines will appear indicating the key to start the BIOS.
 Use the Delete key to go to the BIOS
 - While in the BIOS, go to the Boot section or “Download” in the Russian version.
 Open the “Download” menu
 - Place the flash drive with the recorded image first in the boot queue. This must be done so that when the computer turns on, it starts loading not from the hard drive, but from your flash drive. If you have more a new version BIOS is UEFI, then in the first place you need to put a flash drive whose name begins with UEFI: “Media name”.
 Move the flash drive to the first place
 - Save the changes you made to the BIOS and exit. Loading from the flash drive will start automatically.
 Exit the BIOS and save the changes made
 - When the first installation program window appears, do not start the process; instead, click on the Repair you computer button.

- Select the "System Image Restore" option. Done, wait until the system recovers from what you created installation media.
 Activate the “System Image Restore” function
What to do if these operations don't work
Rolling back to a previous operating system may not work if your Windows.old folder is damaged or lost. If the folder is unusable, then you have only one option - reinstall the system.
Restore may not work for the following reasons:
- The restore point is damaged, use another one, more early point to successfully roll back the system;
- if you are trying to recover via third-party media, make sure that you have installed correct version operating system, and also that it satisfies all the conditions: it has at least 4 GB of free space, formatted in FAT32 or NTFS format;
- if one of the recovery methods suggested above does not work, then try recovering through bootable USB flash drive, reset your computer to its original state, or reset the settings to default values.
What can you do if Windows 10 freezes during a rollback?
If you are convinced that the system is frozen - the process does not move for more than twenty minutes, then you need to manually interrupt the process. Press the "Shutdown" button on the computer case for 5-10 seconds until it turns off. If this does not help, then unplug the device and wait until it turns off. Such actions can lead to an error, so resort to them only as a last resort.
After the computer turns off, start turning it on and enter the recovery menu. Usually, the F2 key is used for this, but on your model motherboard button may vary. Use the prompt that appears on the screen during startup to find the right button. Once you enter the recovery menu, follow the reset and rollback instructions above.
If you were unable to enter the recovery menu, or the process started through this menu also froze, then create installation media and restore the computer using a system image, this method is described in the “Recovery using a program” section. If this does not help, then reinstall the system, while formatting the disk on which you currently have frozen Windows installed.
How to get back after a rollback
If you rolled back to Windows 7 or 8, and then decided to go back to the tenth version of the system, then use the same method as you used before when you switched from Windows 7 or 8 to Windows 10. Update through the update center or an installation flash drive, creating it using the official program from Microsoft - Installation Media Creation Tool. You can update to new Windows, and then roll back to old system, for example, using the Windows.old folder, and then update again to the tenth version of the system.
 Updating to Windows 10
 The transition between versions of Windows can be done either by updating, moving from an old system to a new one, or by rolling back, moving from new system to the old one. To restore full operation of the system, it is not necessary to switch from one version to another; it is enough to reset the settings or restore parameters to default values using built-in functions or bootable media.
All computer owners periodically encounter problems Windows operation after installing the wrong drivers or making changes to the operating system. Creating system restore points can solve this problem.
Dot Windows recovery 10 allows you to return the computer to the last stable state of the computer. When you create a restore point, Windows 10 saves a backup copy of your system files. Thus, instead of completely reinstalling Windows after installing some incorrect driver or catching a virus, you can simply roll back the system.
Restore points are created before installation Windows updates, and also automatically with the frequency that you set. The more free hard drive space you reserve for recovery points, the more recovery dates you have to choose from.
The system allows you to manually create Windows 10 restore points. This may be required, for example, before installing programs that may somehow disrupt the system. If something goes wrong, the computer owner can always roll back the system to the date when everything worked properly.
Please note that recovery points contain only system backups. Windows files 10 that affect the loading of the operating system. Personal folders and files are not included in backups. If you also want to backup personal files, then you need to make a full system image.
Windows 10 Recovery Settings
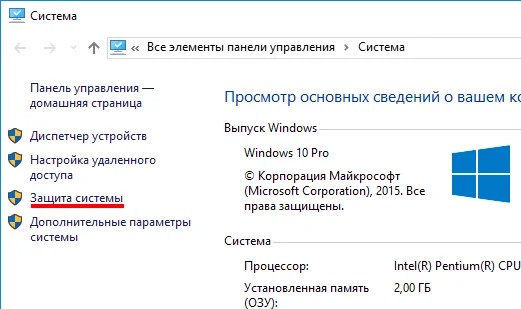
To view the current recovery settings on your computer, right-click on the Start menu and go to Control Panel.
Go to the “System and Security” section.
Go to the “System” section.
Click on “System Protection” in the left column.
The window that opens shows the protection settings for your disks. The disabled state means that no recovery points are made for this drive, and the enabled state means that recovery points are made.

In my case, restore points are made only for drive C, on which it is installed operating system. In order to change the protection settings, select the drive you are interested in and click the “Configure” button.

At the top of the window, you can enable or disable the creation of Windows 10 restore points, and at the bottom, specify how much disk space you are willing to reserve for storing these backups. The larger the volume you specify, the more recovery points will be stored. As this volume fills, old restore points will be erased to make room for new ones. Usually, it is enough to store 2-3 system restore points.
To free up space on your hard drive, you can click the "Delete" button to delete all saved restore points.
Create a Windows 10 restore point manually
In order to create a Windows 10 restore point, on the previous “System Protection” tab, click the “Create” button.

A window will pop up in which you must somehow name the restore point; in my case, for example, I called it “Restore point before installing an incomprehensible driver.” In this case, the date and time of creation of the point will be added automatically. After that, click the “Create” button.

The process of creating a restore point will begin. It usually takes less than a minute. After completion, the “Restore point created successfully” window will appear (see picture above). Now you can install that incomprehensible driver that I was worried about and, in case of problems, roll back the system using a restore point.
Setting up automatic creation of restore points
As already written above, Windows 10 automatically creates restore points before installing updates, and also gives you the opportunity to do this manually. But to be on the safe side, it makes sense to set up automatic creation of recovery points at a time period you specify, for example, every day.
Right-click on the Start menu and go to Control Panel.

In the “Control Panel” in the upper right corner, select “View” - “Small Icons” and click on the “Administration” section.
Open Task Scheduler.
Double-click on the items "Task Scheduler Library" - "Microsoft" - "Windows" - "System Restore".

In the System Restore branch, an SR rule has already been created to create Windows 10 restore points. All we have to do is specify the interval at which this rule will be triggered. Double-click on the SR rule.
In the window that opens, go to the “Triggers” tab and click “Create”.
In the next window, you can set the period when Windows 10 restore points will be created. You can specify daily creation, weekly, monthly, when the computer starts or when it is turned off, and so on.
The period for creating points should be selected based on the reserved space on the hard drive for storing backup copies, since when this volume is filled, the newest recovery points will erase the oldest.
After you have selected the period for creating recovery points, click OK.
Restore Windows 10 to a restore point
Now that we have learned how to create restore points manually and automatically, we will tell you how to restore your system after a failure.
There are several ways to roll back the system using restore points - using Windows interface 10, using the command line, as well as using diagnostic tools.
System rollback via Windows interface
The easiest way is when you can start Windows 10. In this case, we do everything as at the beginning of the article. Right-click on the Start menu and go to Control Panel. Next, go to the “System and Security” - “System” - “System Protection” section. In the System Protection window, click the Restore button.

The Restore System Files and Settings Wizard will open. Click Next.
In the next window, check the “Show other restore points” checkbox. This list shows all possible restore points. The left column shows the dates the restore points were created. The middle column provides a description to help us identify the point.
As you can see in the screenshot below, the restore point called “restore point before installation of the unknown driver”, which I created in the second chapter of this article, is listed as the last one created.
Finally, the right column indicates the type of recovery point creation (manual, system or installation), that is, under what circumstances the backup was created.
Also, you can click on the restore point of interest and click “Search for affected programs.” The window that opens will display a list of programs that will be affected by rolling back to this restore point.
When you have selected the restore point to which we want to roll back the system, click “Next”.

Mar 3 2015
How to restore Windows 7 on a laptop, a black screen appears when booting, the recovery environment does not work, I deleted all hidden partitions, there is no original disk with Windows 7.
I spent a lot of time, tell me what to do now, or at least how to insure myself against such situations in the future, preferably without using paid programs Reserve copy data.
How to restore Windows 7 system
Unfortunately, there are many reasons for this problem, ranging from incorrectly written drivers, harmful effects of a virus, errors file system and ending with our erroneous actions when working with a computer, there is no need to be afraid of such problems, you need to learn how to deal with them effectively.
Let's think about how to restore a Windows 7 system, and also insure ourselves in the future against possible troubles using the backup and recovery tools built into the operating system.
We will learn how to restore Windows 7 without using third-party backup programs, even when System Recovery Options do not load and the F-8 button is useless.
Has in its arsenal quite powerful and good tool-> Recovery environment, which is created automatically when installing Windows 7 in a hidden partition and contains five other tools that solve numerous malfunctions and problems.
Note: If you learn how to use Windows 7 recovery tools correctly, and this is not difficult, then you can do without additional and paid data backup programs.
You can launch the recovery tool by pressing the F-8 button on the keyboard immediately after starting the computer. After this, the menu Additional boot options will open in front of you: Troubleshoot your computer, then Safe mode, Safe Mode with Boot network drivers etc.
A small digression: Before selecting Troubleshoot your computer, try the easier option - Last Known Good Configuration - in simple words, the operating system always remembers the last successful boot of the computer and enters this information into the registry.
If there are problems loading, Windows can remember the registry settings and driver settings that were used when the system was last successfully booted and use them if you select the Last Known Good Configuration option.

If this tool does not help, select the first -> Troubleshoot computer problems.

Next we go to the Recovery Options menu Windows systems 7, this is what we need, this is where we can choose the System Restore tool we need, there are five of them in total, let’s take a closer look at how they all work.
The first thing to do is apply Startup Repair (Automatically fix problems that prevent Windows from starting).

Required digression: After pressing the F-8 button when booting the computer, you may not have the item > Troubleshoot your computer, but only Safe Mode and so on, the question arises why.
When installing Windows 7, a recovery environment partition is created automatically and is located in the root of the drive (C:) in the Recovery folder. You can also see in the Disk Management window - a separate, hidden partition of the hard drive, its volume is only 100 MB, it is used for storage boot files boot configuration (BCD) and system bootloader (bootmgr file).
You can see it under Computer->Management->Disk Management. Under no circumstances should you delete this partition (many people delete it out of ignorance), otherwise you will not have the recovery environment start, that is, you will not have the Troubleshoot your computer option, and in more severe cases, you simply will not boot the system.

In the lower screenshot you can see another hidden partition, with a capacity of 9.02 GB, this is a hidden recovery partition with factory settings on my laptop, yours may be larger or smaller. It’s also better not to delete it; if necessary, you can always restore Windows 7 from it.

What should you do if you do not have a partition with a recovery environment and when you press the F-8 button in the Additional boot options menu, the Troubleshooting computer option does not appear? How then to restore the Windows 7 system?
An installation disk with the Windows 7 operating system can help here. You can run the recovery tool by booting from the original installation disk Windows 7 by selecting System Restore at the very beginning.
If you don’t have an installation disk, then you can use the Windows 7 Recovery Disk (you can make it in any running Windows 7) in five minutes, then you can also boot from it and do the same.


So we finally got into the System Recovery Options, either using the F-8 button and the Troubleshooting item, or the installation Windows disk 7 or Windows 7 Recovery Disk.
In the System Restore Tools Selection menu, select the first one:
Startup recovery-> there will be an analysis of faults that interfere with normal booting Windows 7 and their further correction for normal loading and functioning of the operating system.
During the process, we may be warned that problems have been detected in the boot parameters, click Fix and restart.


System Restore-> using this function we can select a previously created system restore point, if we have it enabled, and roll back to the time when our Windows 7 worked and loaded perfectly, everything is simple here.


Restoring a system image-> I personally use this tool; if used skillfully, it can replace paid data backup programs. If you are interested, read on.

What's good about it? It will help when you don't have the original Windows 7 installation disk and you've deleted the hidden partition with your laptop's factory settings, but that's not all.
Sometimes there are situations when, for various reasons or due to the actions of a virus, you will not be able to boot the operating system at all, or many people ask How to restore the Windows 7 system, even if the menu with Additional boot options is also unavailable. Should I reinstall the operating system again?
Therefore, immediately after installing Windows 7 on your laptop or computer, using this function -> Restore system image, we create an archived image of our Windows 7 on the hard drive, and take care of it.
You must create a Windows 7 Recovery Disk (read below), it will help you use the System Image if the Advanced Boot Options menu does not load.
Go to Start -> Control Panel -> Back up computer data.

Select “Create a system image”.

In my case, Local disk (E:), if you have system unit some hard drives, then of course it is better to place the backup on the hard drive where the operating system is not installed.

By default, the data archiving program will automatically select a partition with the Windows 7 operating system; if you wish, you can add Local disks for archiving, as long as you have enough space.

Note: You may notice that I have two operating systems installed on my laptop, so the archiving program selected two Local disks.

Click Archive and the process of creating an archive with our Windows 7 will begin.
Created, it will look like this.

Now, if necessary, you can deploy the archive with Windows 7 to your computer in 20-30 minutes. It would be better if you additionally copy the archive with the system onto a portable hard drive, this will doubly protect you.
Let's imagine that we can't start Windows 7 and deploy the backup we created, let's do it together.
We launch the Windows 7 Recovery Tool by pressing the F-8 button on the keyboard immediately after starting the computer.
The Advanced boot options menu opens, select Troubleshoot your computer.

Restoring a system image


Use the latest available system image.


Of course, all our data is on Local disk, where the operating system is now being restored, will be deleted, so you can first boot from any Live CD and copy what you need.
How else can you restore your Windows 7 system? Of course, using the Windows 7 Recovery Disk.
Let's create one that can be used to boot the computer; it will contain recovery tools that can be used to repair Windows 7 boot problems, as well as restore the operating system from the backup copy that we created in advance.
Important: For a recovery disk, the bitness of the system is important, you can use a 32-bit recovery disk for any 32-bit Windows 7, and a 64-bit recovery disk for any 64-bit Windows 7.
Let's go again Archiving computer data.

Create a system recovery disk, insert the DVD into the drive, click “Create disk”.


When Boot Disk Windows 7 recovery will be ready, put it in a safe place.
To restore Windows 7 from a Recovery Disk, you basically don’t need any working operating system at all.
You will only need to change the boot priority to the disk drive in your computer’s BIOS, insert a recovery disk into it and restore your Windows 7 using the archive.
Many here can draw an analogy with data backup programs, and this is correct, they work on the same principle, only their functionality is, of course, more convenient.
Recovering Windows 7 from a Recovery Disk. I show you how to do it. Let's say we're in trouble, we can't start Windows 7, when we press F-8 on the keyboard immediately after starting the computer, nothing happens.
We cannot get to the menu with Additional boot options and an error message is displayed. In this case, the system archive on the hard drive is not available to us. This is exactly the kind of trouble that happened to our reader Ilya, who wrote us a letter asking for help.
In this situation, many people reinstall Windows 7 from scratch, but not you and me, because we have a System Recovery Disk.
We insert it into the drive and reboot, set the BIOS to boot from the drive, as I said, the disk is bootable, the System Recovery Options program starts.
Press Enter until the prompt to boot from the disk disappears.


Automatically, the recovery tool running from the disk will try to recover Windows startup 7.


If nothing works, select any tool, for example, try Restoring a computer using a previously created operating system image.


We use the latest available system image.


What other ways are there to restore Windows 7?
There is another little-known way to restore Windows 7 boot after a failure, and I’ll tell you about it. At first glance, it may seem difficult to many, but nevertheless it often helps me out.
The fact is, friends, that a very large part of the problems due to which you cannot boot Windows 7 lie in registry errors. And Windows 7 would not be Windows 7 if it did not have a mechanism that protects registry files. Such a mechanism exists and creates backup copies of the registry in the RegBack folder every 10 days, regardless of whether you have system recovery enabled or not.
If you cannot solve problems loading Windows 7, you should try replacing the existing (and apparently damaged) registry files from the Config folder with archived files from the RegBack folder. To do this, we will have to boot the computer from the Windows 7 installation disk or the Windows 7 recovery disk.
Boot into the recovery environment and select the command line.

We type in it - notepad, we get into Notepad, then File and Open.

We go into the real explorer, click My Computer. Now we need the system drive C:, attention, the drive letters here may be mixed up, but the system drive C: I think you can tell by the system drives inside Windows folders and Program Files.

We go to the folder C:\Windows\System32\Config, here are the active registry files, specify the File Type - All files and see our registry files, we also see the RegBack folder, in which every 10 days the Task Scheduler makes a backup copy of the registry keys.

So, we will replace the current registry files from the Config folder with backup registry files from the RegBack folder.
So, first of all, let’s delete from the C:\Windows\System32\Config folder the files SAM, SECURITY, SOFTWARE, DEFAULT, SYSTEM, which are responsible for all registry hives (my advice is to copy the registry hives somewhere before deleting, just in case).

In their place, copy and paste files with the same names, but from backup copy, that is, from the RegBack folder.


Note: The SAM, SECURITY, SOFTWARE, DEFAULT, SYSTEM files cannot be deleted all together; delete them one by one. Then copy the same files from the RegBack folder in their place.
Friends, if this does not help, use Windows 7 file integrity recovery; if the operating system does not boot, it is done in exactly the same way as in Windows 8.
What else do we have left of Windows 7 recovery tools?
Memory diagnostics 7-> checks system memory for errors. Command line -> using it you can delete files that interfere with loading Windows 7.
I hope our article on how to restore Windows 7 system helped you.
Due to viruses, driver inconsistencies, or software, the OS may malfunction. If your Windows crashes, don’t rush to panic. The situation can be corrected by returning the state of files and programs to the moment when the PC was working properly.
While running OS Windows 7, 10 or 8, certain errors and problems may occur. As a result of such failures, starting the operating system again in operating mode becomes impossible. In this case, it is not at all necessary to do a time-consuming reinstallation of the OS. All you need to do is perform a system restore.
Recovering the OS using the recovery environment
When working we use the following scheme of actions:
- Reboot the computer, press the F8 key while loading;
- Troubleshooting;
- System restore, selecting an OS restore point;
- Click "Further" and again "Further";
- Press the button "Ready", we reboot the system (in the Menu, select boot with the last successful configuration).
There are several methods you can use to get your OS running again. Some of them rely on rolling back to saved settings. Others simply clear the data.
You can “reanimate” the OS in one of the following ways:
- by selecting restore points;
- using the command line;
- through safe mode;
- using a recovery environment;
- using an image/boot disk.
Restoring the operating system using system “resuscitation” checkpoints is one of the most affordable, effective and popular options. To apply it, you need to make a series of clicks:
- Panel "Start";
- "System Restore";
- "Further";
- "Select a restore point";
- "Ready".
With such an operation, problems with the computer will be corrected, changes will be canceled and the system will be returned to the operating state that allowed the PC to boot normally. There is no loss of data, files and documents with this type of recovery. All data is saved. The operation is reversible. You can roll back the system to a previous computer state and use a different restore point.
Many people wonder how to make a recovery point on their own (manually) in order to choose it in the future? To do this in the same menu "Start" - "System Restore" You can create such a point yourself at any time convenient and suitable for you. It will be saved indicating the current date, which you just have to remember.
From restore point
In computer engineering there is such a thing as a recovery point. These are saved PC settings. As a rule, saving occurs automatically with each successful OS boot. Most easy way Windows 7 renewal is to use exactly this data.
Press F8 when your computer boots. This command will bring up a menu of system startup options. Next, you need to select the Last Known Good Configuration option.
Another method can be used. Go to the properties of the My Computer folder. Find the line System Protection, clicking on which will open the dialog box of the same name. Click Recovery – Next. We set a target date, indicate the disks that need to be fixed, and confirm the actions. After rebooting, the PC should work normally.
No restore points
You can fix problems with the OS without restore points. To do this you will need to resort to the LiveCD program. You need to download it and burn it to a flash drive with the .iso extension.
Further all actions will take place in the BIOS. You need to configure booting from a flash drive. To do this, in the Boot section, select USB-HDD in the First boot device line.
Before proceeding directly with the recovery, copy all the necessary files to removable drive. The LiveCD program provides a special menu for these purposes.
We will fix the system error using an archived copy. Connect the USB flash drive, open the Windows\System32\config\ folder. Files with the names default, sam, security, software, system must be moved to any other folder. In their place, transfer similar files from the RegBack folder and restart the computer.

The described method will only help if the problem is related to the registry.
Command line
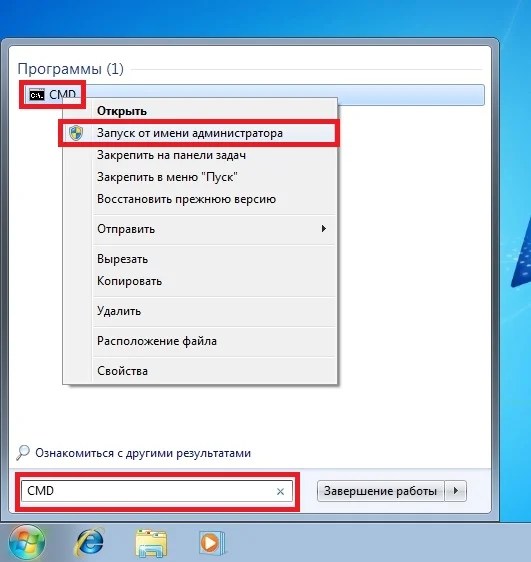
You can resort to “reanimating” Windows 7 from the command line if the PC begins to freeze or works slowly, however, the system still boots. Enter the menu "Start" and using the right mouse button, launch the command prompt as administrator. Run the rstrui.exe command, which will open the system restore program. Click "Further". In the next window, select the desired rollback point and click again "Further". Once the process is complete, the PC should work normally.
There is another way to access the utility. Let's go to "Start". To open the command line, click "Run" and enter the CMD command. We click on the found CMD.exe file and wait for it to launch. Next, enter rstrui.exe in the command line and confirm the action with the Enter key on the keyboard.
It is not always possible to play it safe and create OS restore points in advance. Problems may arise that block the option of such “reanimation” of the PC. Then you can use another, no less effective and easy option - restoring the Windows system using the system itself.
We rely on the diagram:
- Icon "My computer"- right mouse button "Properties";
- "System protection";
- In the new window click "System protection", recovery button;
- "Further";
- Select a restore point according to the date;
- Specify the system disks to be restored;
- We confirm the operations and reboot the system.
Restoring Windows 7 using Safe Mode
This method is preferred if the usual system boot is impossible. Then after pressing the PC power button on the system unit, hold down the F8 key to call "Start Menu". One of the "Menu" options is "Safe mode". Select it and press Enter on the keyboard. As soon as Windows boots, we carry out the algorithm of actions that we described earlier.
System recovery Windows 8/8.1
If you managed to start the OS, you can resume Windows 8 via "Options". Hover over right top corner and enter them. Click on "Change computer settings" – . Chapter "Recovery" will offer several options:
- "Regular recovery with information preservation".
- “Deleting data and reinstalling the OS”.
- "Special option".
Decide what exactly needs to be done. Next, follow the menu prompts.
If you choose the latter method, in the window that opens, click on the diagnostics item. You will be offered the following options:
- "Restore";
- "Return to original state";
- "Extra options". This item includes the ability to roll back to the desired resume point.

To resume Windows 8.1, press Win+R and call sysdm.cpl. In the system properties window in the tab "Protection" specify the required system drive. Click "Restore". Clicking "Further", you will be able to see a list of rollback points. Select the one you want and click "Search for affected programs". Changes that have been made to the PC since the selected moment will be deleted. Complete the process by clicking "Ready".
If you work with Windows 8, problems may occur, the Internet may not work correctly, etc. To fix this, you can use the classic recovery method through restore points.
Another option is a system rollback. To do this, open the menu "Start" - "Control Panel" - "Windows Update". Select an item "Removing updates". The same can be done using the command line.
So, in the list of updates that opens, we delete those from the moment of installation of which (we look by date) problems and malfunctions began. We delete unnecessary files and reboot.
You can perform a factory reset on Windows 8.1. Important files will not be affected during such an operation. The method is effective, but to implement it, the OS needs to boot without problems. We use the algorithm:
- Right side of the monitor - "Options";
- "Change settings";
- "Update and Recovery" - "Recovery";
- "Recovery without deleting files".
If you cannot log into the system in the usual way, you must use the disk with the system. Load the installation disk, select "System Restore". Press the button "Diagnostics", And "Restore".
If you have problems with Windows 10, press Windows + Pause. Go to "System protection" and press "Restore" – "Further". Select the desired indicator and click again "Further". When finished, click "Ready". The computer will automatically restart and the changes will take effect.
One of the advantages of the “ten” is the ability to return the settings to factory settings. This helps avoid having to install the system all over again. To reset your data go to "Computer Settings" – "Update and Security" – "Recovery" – "Return the computer to its original state". Click "Begin".
You can take care of the possibility of a rollback in case of failure in advance. You can create resume points yourself or configure their automatic creation at the desired frequency. To do this, in the settings, in the Update and security item, select Backup service. Specify where to save copies, click Add disk. After selecting the device, the function will be activated.
You can restore your Windows 10 system again by using restore points. In this case, the system will be rolled back to the moment when it loaded smoothly and worked without failures. This recovery method is described at the beginning of the article.
If the OS does not boot, a warning table with a key appears on the screen "Additional recovery options". Click it and select "Diagnostics" - "System Restore". We select a Windows restore point, wait for the system to roll back and reboot.
If such operations do not help and the computer continues to work incorrectly, you can roll back to basic settings. Some programs and utilities, personal PC settings will be reset, and personal data will be deleted.
This technique is used extremely rarely if the other options described above do not help. The algorithm of actions is as follows:
- "Start" - "Selecting parameters"- tab "Updates and Security";
- Paragraph "Recovery"- button "Begin";
- We choose to delete all files or keep some of them.
Recovering the system after this will take 40-90 minutes.
Resuming using the installation disc
One of the radical methods of fixing the error involves using an installation disk. After launching it in BIOS, click System Restore. In the Troubleshooting section, specify the desired action. Next, follow the system prompts to complete the process.
Windows 10, the restoration of which can return the computer to its original state, has several options for this action, let's look at the restoration Windows systems 10!
Since the OS itself is a rather complexly organized structure, the frequent occurrence of problems and errors is understandable. On the other hand, like any complex system, Windows also has tools for its recovery, knowledge of which can help you “revive” your computer and save important data relatively easily and without significant losses.
How to restore Windows 10
Of course, the notorious Windows 10 system recovery tools differ in the specifics of their work and in terms of the final result. They will be discussed below.
To begin with, it is necessary to specify situations in which it makes sense to return the OS to its previous state.
Windows 10 is not working correctly, and an update (standard for the OS itself or a driver) or some application was recently installed.
Most likely, the reason is precisely what was recently established. In this situation it is possible. You can do this in several ways:
In the command line, run the command as an administrator and type rstrui - the return to point interface will open.
You can also get to this window through the control panel - Recovery.

Pressing "Run System Restore" The interface we are already familiar with will open.


After selecting a point and clicking on the “Next” button, the return process will begin, which takes several minutes (10-15 or more). This process affects installed applications and user files modified after the point was created.
In order to be able to perform Windows recovery 10 using restore points, you need to make sure they are created automatically. To do this, in the Control Panel - Recovery window, you must select "System Recovery Setup".

In the table of available drives, you need to check whether OS protection is enabled. If enabled, recovery points are created automatically. If not, the point will be created only manually. To create a point, click “Create” and specify the name of the point to be created.

To enable automatic creation of points (Windows OS protection), you must click “Configure…” and select "Enable system protection". 
If you are unable to log in, you can use this function via recovery environment (WinRE). You can get there in several ways:
- On the lock screen (password entry), you need to click "Shutdown", hold down the key. After reboot you need to select “Diagnostics” – “Advanced parameters” – “Command line”– run the rstrui command.
- Turn off and on the computer several times using the power button (not the safest way). These manipulations will also allow you to enter the recovery environment and take further actions.
Windows 10 is not working properly, but no updates or applications have been installed recently.
This option is already more ambiguous. The reason for the system not working correctly may not be so obvious. In this case, reverting Windows 10 to its original state may help. To do this, you need to open Settings, then "Update and Security".


To start the process, you must click “Start”.

If the system does not boot, you can enter the recovery environment () and select “Diagnostics” – “Return the computer to its original state”.
In this case, we may be offered options for restoring the Windows 10 system:
- Save files – as a result, the OS will be reinstalled with all personal files saved, but will be deleted installed drivers and applications, all changes made to the settings and all applications pre-installed by the manufacturer will also be deleted (If you purchased your computer with installed system Windows 10, applications from the computer manufacturer will be reinstalled).
- Remove everything - this will reinstall Windows 10, removing personal files, removing installed applications and drivers, and removing all changes made to the settings and all applications pre-installed by the manufacturer (If you bought a device with Windows 10 already installed, then applications from the computer manufacturer will be automatically reinstalled). This option is also best used if you are going to recycle or sell your computer; cleaning the disk may take several hours, but after that it will be very difficult to get the data back.
- Factory reset(if available) – as a result, Windows 7/8/8.1/10 will be reinstalled, personal files will be deleted, installed drivers and applications will be deleted, all changes made to the settings will also be deleted, and all applications pre-installed by the manufacturer will be reinstalled.
Important! After completing this procedure, the option to return to the previous build will no longer be available.
The system does not boot and you previously created a recovery disk.
To use this option, you need to connect the drive to your computer. Next, after loading the recovery environment (WinRE), you need to select “Troubleshooting” – “Advanced options” – “System recovery”. As a result, recently installed programs, system or Office updates, and drivers that may cause problems on the computer will be removed, but personal files will remain intact.
Also, if you have a disk, it is possible to return to its original state (see the previous paragraph).
Learn how to create a recovery disk.
The system does not boot and no recovery disk has been created previously.
In this situation, installation media can help - a disk, a USB drive from which you can perform a clean installation of the system. If such a medium is not at hand, then it must be created. You can do it this way:
- On your work computer, open the Microsoft software website.
- Click "Download the tool now", wait until the tool is downloaded and run it.
- Select "Create installation media for another computer".
- Configure the required settings - language, edition, and architecture (64-bit or 32-bit).
- Follow the instructions to create installation media until the process is complete.
- Connect the newly created installation media to the non-working computer and turn it on.
After this, you need to boot from the installation media and select the option "System Restore". Further, the set of possible actions is similar to the previous paragraph of this article.
The computer won't boot, no recovery disk was created, and the reset failed.
In this situation, there are no options other than performing a clean installation. To do this, you will need to create installation media (how to do this is described in the previous paragraph of the article). In general, the system installation process, although global for the computer, is not complicated. The main thing is to correctly configure booting from installation media. After downloading from it, you must select "Install Now". At the next stage, you will be asked to enter a key to activate the system - you can enter it here or click on the button "I don't have a product key" To continue installing the system, activation in this case will need to be carried out immediately after the desktop appears. You will then be asked to read the license agreement and accept it to continue. In the next step you need to click "Custom installation". After this, a window will appear with the sections into which it is divided HDD. You must select the appropriate section and click “Next”. During the system installation process, the computer will restart several times. As a result, a clean system will be installed, all applications and drivers will be removed. The files will be saved in the Windows.Old folder on drive C, and you can move them from there if you wish.
Within a month after updating to Windows versions 10 (and within 10 days after updating the build), it is possible to return to the previous build - this will return the computer, programs and files to the state in which the device was immediately before the update. Launch this process you can either through “Settings” (section “Update and Security” - “Recovery”), or through the recovery environment (WinRE, login methods are described above).
In general, the options described above make it possible, if not to completely return the computer to its normal state, then at least to return it to working capacity. All of these options differ in execution time and the use of each of them depends on the original problem.
Have a great day!