Virtual keyboard button. Virtual keyboard - how to enable it on your computer
Virtual keyboard or “correctly”: “On-screen keyboard” is intended for entering characters into a request field, for example, the address bar of a window, a text document, etc.
There are rare cases when you urgently need to type something, but the keyboard is broken or does not exist at all. A virtual keyboard will help us solve this problem.
By the way, such a keyboard is necessary not only because there is no main “manual” keyboard, it is sometimes necessary for security purposes (there are malicious programs “keyloggers” on the Internet that are designed to track actions on the computer and transfer this data to a third party).
: Learn to find and open the On-Screen Keyboard program ( virtual keyboard).
: installed system Windows.
Options for enabling the virtual keyboard
In this lesson, we will look at several options for enabling the built-in keyboard using Windows 7 as an example, and you can choose for yourself which option is more convenient or faster.
Start and quick search
This is the fastest option, other than assigning a key combination (this method is described below, the most recent).
To quickly find a program " Screen keyboard", go to "Start" and in the line quick search enter the word “screen”:
Rice. 1. Search for the on-screen keyboard through “Start”
A moment later, at the top we will see the search results, there we find the entry “ Screen keyboard"and left-click on it:

Rice. 2. Launch the On-Screen Keyboard program
Start and search for a program
This option is the most accurate and correct, but the longest. First, go to “Start” and left-click on the “All Programs” element:

Rice. 3. “All programs” button
After this, a menu with all programs will open, scroll the list of programs to the very bottom (if it is large) and click on the “Standard” element (folder icon) with the left mouse button:

Rice. 4. Click the “Standard” button
After this, the composition of this folder will open to us, in it we look for a folder called “Special Features” and left-click on it:

Rice. 5. Click the “Special Features” button
This folder will also open and in this list we find the program “ Screen keyboard" and click on it with the left mouse button:

Rice. 6. Location of the On-Screen Keyboard program
After we click on the program icon, the main window of the “On-Screen Keyboard” program or the so-called virtual keyboard:

Rice. 7. Main window of the On-Screen Keyboard program in Windows 7
For those who often use the virtual keyboard
If you need to use the virtual keyboard frequently, then constantly logging in through “Start” will be too time-consuming and inconvenient.
To quickly call up the virtual keyboard, you can assign so-called “hot keys” or a combination of them. Those. we will launch the virtual keyboard by pressing just a few keys 1 time.
In order to assign a key combination to call the on-screen keyboard, we need to go to the properties of this program (or shortcut).
To configure, click the “Start” button and enter the word “display” in the quick search bar:
Rice. 8. Search for the on-screen keyboard through Start
At the very top, usually the first position, a result will appear with the name " Screen keyboard" Find this result and right-click on it and select “Properties”:

Rice. 9. Program “Properties” button
After this, the “Properties: On-Screen Keyboard” window will open. In it we are now interested in the “Quick call” field:

Rice. 10. On-Screen Keyboard Properties Window
If the program does not already have hotkeys assigned, the “Shortcut” field will be “None”. Now the most interesting part: we need to come up with and remember/write down a future key combination, by pressing which we want our virtual keyboard to open. Many key combinations are reserved in the system, so try to check if “Your combination” is free.
To check if a key combination is free, the most in a simple way, you need to minimize all open windows and, while on the desktop, press the planned combination. If nothing happens after pressing a key combination, it means it is free.
For example, I will use the keyboard shortcut: " Ctrl + Alt + K" This entry means that to call the virtual keyboard we will press these 3 keys at the same time. "K" was chosen because it is the first letter in translation into English language the words "keyboard".
In order to assign this key combination to the program, left-click in the “Shortcut” field and press the required key combination. After which our combination should automatically appear in this field:

Rice. 11. Field for entering the desired key combination

Rice. 12. Saving the required key combination
Being, say, on the desktop, press the reserved key combination “ Ctrl + Alt + K"and after a while our virtual keyboard will open:
Rice. 13. Windows 7 On-Screen Keyboard
All that remains is the simplest thing - choose the most convenient one from these three options and use the virtual keyboard. I recommend you check out other lessons on our website, choose what interests you and enjoy.
The Windows 7 virtual keyboard consists of keys that appear on top of the desktop or any other windows. In order for it to appear, it must be turned on, and to do this, perform a certain sequence of actions.
Why does the operating system include on-screen keyboard support?
Few people understand why operating systems Windows has a feature to show the keyboard on the desktop. To understand this, you need to refer to the help and supplement it a little.
First of all, a virtual keyboard is required for those people whose fingers are inactive or absent. In addition, it can help if the keys on a regular keyboard suddenly stop working, and you urgently need to add text or type the name of the file recipient.
Recently, devices such as tablet computers have become very popular. Regular devices can be connected to them using bluetooth or wi-fi, but in the absence of wireless devices and USB sockets, work would be incredibly difficult if not for the virtual keyboard.
It can also help protect against malware called keyloggers. They read passwords that are entered from a physical keyboard and then send them to the attacker.
How to enable a virtual keyboard if there is a regular one?
- Method one. IN latest versions Windows OS conveniently implements search functions. Just click on and enter "on-screen keyboard" in the search bar. Now click on the top search link and the desired window will appear on the screen.
- The second method is more efficient. You just need to press the combination and a window called “Run” will open. Write “osk” or “osk.exe” into it, and then click on the “OK” or “ENTER” button. If the window does not open after clicking, you will have to do several extra steps. First, hover over the Start menu and right-click on it, select “Properties”. Find the “Settings” button on the right and click on it. After clicking, another window will open in which you need to check the box next to the words “Run”.
How to enable the virtual keyboard if the steps described above are done, but nothing works? Just open the "Start" menu, and in the right column select "Run", now you can easily enter the file name "osk" or "osk.exe"
How to enable the virtual keyboard if the regular one does not work?
The on-screen keyboard can only be opened using the mouse.

Click on "Start", then on "Control Panel" and select "Ease of Access".
A window called "Ease of Access Center" will open.
After clicking on "Enable virtual keyboard", the required keys will appear on top of all windows.
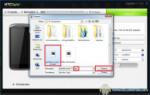
Open Explorer by double-clicking on the “My Computer” shortcut (it is advisable to perform this action as an Administrator).
Since enabling the virtual keyboard is not always possible from the Control Panel, especially if the computer is infected, sometimes you need to open the executable file yourself.

Settings and additional features
The virtual keyboard is open on the screen, how can I enable its settings window? There is nothing complicated about this - click on the "Options" button. Here you can choose a reaction to hovering by simply holding over a certain key - it will be considered that this key is pressed.
Shutdown
Often, after some time of operation, the OS feature in the form of an on-screen keyboard becomes unnecessary. To disable a window that is no longer required for operation, in its right top corner Click on the buttons familiar to the user: the symbol to collapse, or the cross to close completely.
The virtual keyboard appears as keys located on top of all windows and the desktop. To call it in the Windows 7 operating system, you must perform a certain sequence of actions. They will be discussed in this article.
Why is on-screen keyboard support needed?
Many users do not understand at all why Windows has the function of displaying the on-screen keyboard. To understand why this function is used, let's look at the reference material. The virtual keyboard is primarily designed for people who have missing or immobile fingers. It can also be used if a regular keyboard refuses to work.
In recent years, tablet computers have become increasingly popular. You can connect to them peripherals using wi-fi or bluetooth. However, if there is no USB connector and wireless connection working with these devices would be terribly inconvenient if not for the on-screen keyboard. The virtual keyboard also helps protect your computer from keyloggers. These are malicious programs that read passwords entered from a regular keyboard and send them directly to attackers.
How to turn it on on-screen keyboard?
There are several methods you can use to enable the virtual keyboard.
1. Using search
The latest versions of the Windows operating system have a very convenient search function. To use it, just click on the “Start” button and enter the phrase “on-screen keyboard”. After that, click on the top link. The window you need will appear on the screen.
2. Using a keyboard shortcut
The second method of calling the on-screen keyboard is more efficient. All you need to do is press the key combination “Win” + “R”. As a result, the Run window will appear. You must enter “osk.exe” or simply “osk” into it. Then click on “Enter” or “Ok”. If the window you need does not open after pressing a key combination, you will have to do a little work. To begin, hover your cursor over the Start menu bar, then right-click on it and select Properties. On the right side of the window that opens, select “Settings” and click on it. After clicking, a window will appear in which you need to check the box next to “Run”.
How to enable the on-screen keyboard if the regular one does not work?
You can open the on-screen keyboard using only the mouse pointing device. To do this, click on the “Start” menu, then select “Control Panel” and find the “Ease of Access” line. As a result, a window called “Ease of Access Center” will open. Here, select “Enable virtual keyboard.” As a result, keys should appear on top of all windows.
Sometimes, due to the activity of viruses and malware, you cannot enable the virtual keyboard from the Control Panel. Then you will have to manually open the executable file. To do this, go to the path “C:\\Windows\System32\” and run the file “osk.exe”.
Additional features and settings
To enable the virtual keyboard in the settings window, just follow these steps: Click on “Options” and select a hover response.
Disabling the on-screen keyboard
Perhaps after some time the need for an on-screen keyboard will no longer be necessary. This function will become unnecessary. To disable it, you just need to click on the OS familiar to all users Windows icons, located in the upper right corner of the virtual keyboard window. To close the window completely, select the cross, and to minimize the window, select the underscore symbol.
The virtual (on-screen) keyboard is an analogue of the physical keyboard, which is controlled by the mouse pointer. This article will show you how to enable the on-screen keyboard on Windows 7, 8, as well as how to set it up, use it, run it, and turn it off when the OS boots.
A keyboard on a computer screen is necessary in the following cases:
- There is no physical input device.
- The input device is faulty or the keys on it do not function.
- Health problems that keep you from typing normally
How to enable the keyboard on your computer screen
The virtual input device launch file is located in the System32 folder of the windows directory and is called osk.exe, from here you can call the virtual keyboard, but few people will use such actions. There are enough ways to enable the on-screen keyboard on Windows 7, 8. Let's look at each of them in more detail.
Enable virtual input device in windows 7:
2. Launch Control Panel, set the view to "small icons". Find the "Ease of Access Center" object and launch it. The last action that needs to be done is to click on the “Enable on-screen keyboard” object.

3. In the Start search, type “on-screen keyboard” (without quotes), then press Enter.
4. In the Run command window, enter osk.exe. Click OK.
5. If you have a password to log into the system, then click the accessibility icon, which is attached to the lower left corner. Check the box for input without keyboard and click OK. After this the screen windows keyboard 7 will open. In the upper left corner you can change the input language.

Enabling a virtual input device in Windows 8 due to the changed interface is different, but point 4 above can be used here. Use one of the methods below:
1. Click Start to exit to start screen. At the bottom left, click the downward-facing arrow. In the application menu, move all the way to the right. Find and open On-Screen Keyboard.

2. In the Control Panel, in the “View” area, select “Large Icons.” Next, find the “accessibility” element and click it. Next, click “turn on on-screen keyboard.”

3. Call up the search using the Win + W key combination, select the search location “everywhere”. Enter “on-screen keyboard” into the search bar (no quotes needed). We wait, then select the desired object from the list below.

4. To use the electronic keyboard to enter your password when logging in, click the icon shown in the screenshot, which is located in the lower left corner. In the menu that appears, click “on-screen keyboard”.

In most cases, they resort to a virtual input device when it is not possible to use a physical input device. To enable the Windows 7 on-screen keyboard with the mouse, use recommendations 1, 2, 5 for seven, and 1, 2, 4 for eight. Various ways to bring up the keyboard on the screen are described above.
How to start and remove automatic loading of the electronic input device when entering the OS
Now let's look at how to enable or disable the Windows 7 on-screen keyboard when loading the OS. Autoloading of the virtual keyboard is especially important if you use it on a regular basis, or are faced with a password entry situation account first time in this way. Please use one of the options below.
1. Bring up the keyboard on the computer screen using one of the methods described above. At the bottom, click the "options" button. Follow the link to control when the on-screen keyboard starts when you log in.

2. Get to accessibility options in the control panel using method 2 described above for windows 7, 8. Select the option marked in the screenshot.

In the control panel element that opens, check the box next to “use on-screen keyboard.” Click OK. After which the computer keyboard will automatically appear on the monitor screen every time the OS boots. By performing the reverse steps, you can remove the on-screen keyboard from Windows startup at any time.

How to use and customize the virtual keyboard
The on-screen keyboard is controlled with the mouse. You need to put a blinking mouse cursor instead of entering text. Next, use the left button to press the desired keys, key combinations, for example, to change the language on the on-screen keyboard.
Note: if there are problems with input, read the materials: why the input language does not change, it’s gone Language bar windows.
To configure the input format and other parameters, click the “Options” button. Here you can change the following settings:
- Sound confirmation – each press of the virtual keys will emit a sound signal.
- Enable numeric keypad – enables additional buttons on the right. It was used to create an untitled folder in the previous article.
- Keystrokes – specifies input by clicking the left mouse button.
- Hover over keys – a character is entered when you hover the mouse cursor over it, with the ability to select the hover duration.
- Scanning keys – selecting a range of buttons in one line across the entire width, then after pressing the selection keys, scanning occurs along the selected line in a smaller range until the required button is pressed. You can set the scanning speed.
- Text prediction – options allow you to suggest possible words when typing the first letters and put a space after them.

After changing the parameters, do not forget to click OK.
I would also like to note that when you press Fn, the F1-F12 buttons appear in place of the numbers. When you turn on the numeric keypad, press Num Lock to access numbers.

In Windows 7, 8 there are practically no differences in the on-screen keyboard, except that the eight has a number of additional buttons for improved control. These are the Nav (go), Mv Up (up), Mv Dn (down), Dock (fix), Fade (disappear) buttons.

So we looked at all the ways to enable the on-screen keyboard on Windows 7, 8, as well as the startup process and disabling its autoload. The virtual input device completely imitates the actions of the buttons on a regular keyboard, with the ability to customize it to suit your needs.
nastrojcomp.ru
How to enable or disable the on-screen (virtual) keyboard in Windows XP, 7, 8, 10 on a computer and laptop, how to change the language
An on-screen keyboard is a program that allows you to emulate a physical device. In simple terms, when you turn on the virtual keyboard, a program is launched that displays buttons on the screen, by clicking with the mouse on which the user performs certain actions (typing, entering passwords, etc.). But what is this for?
There are many advantages of keyboard virtualization, let's look at a few of them:
- the ability to avoid interception of entered data;
- no need to have a real keyboard;
- operability even in conflict situations when it is not possible to recognize the device driver;
Enable on-screen keyboard on Windows XP, 7
Click on the Start menu, select the submenu “All Programs - Accessories”, find the “Special Features” folder inside, inside which we find the “On-Screen Keyboard” shortcut, click and launch the program.
The initialization process will begin, followed by startup. In Windows XP OS it looks like this (see screenshot).
The sequence of actions on Windows 7 is similar.
There is another way to open the keyboard through the Control Panel:
Click on the “Start” menu, click on Control Panel, then go to the Accessibility section. 
On the left side of the control panel there should be a “see also” item, click there, we will see a shortcut appear for quickly launching “Screen Magnifier” and “On-Screen Keyboard”. Click on the inscription we need. 
If there is no keyboard in Windows 7
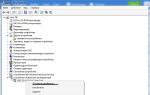
If in Win 7 the required item does not exist in the “Accessibility” subfolder, then open the Control Panel, select the “Programs and Features” section, left-click on the “List of installed components”, select (check the box) “Tablet PC components”. After this, the on-screen keyboard will appear in the system; to launch it, repeat the first step.
Virtual keyboard in windows 8
IN search bar Win 8, enter the text “On-screen keyboard” and the system will offer suitable options.
What is the Registry Editor in Windows and how to use it
On the start screen, open “All Programs”, click on the Accessibility shortcut and launch the required shortcut. 
There is an option to launch the on-screen keyboard when the user logs into Windows by clicking on the corresponding shortcut at the bottom of the welcome screen. 
Opening the keyboard on Windows 10
We go to the same Start menu, open “Settings”, inside the Windows 10 settings window we find the accessibility section, click on it with the mouse. In the page that opens, move the inclusion slider to the “On” position.
As in the eighth version of Windows, in the tenth you can open the virtual keyboard when you log in to the system welcome window; to do this, you need to click on the accessibility icon.
There are even more easy way, to do this, right-click on the taskbar, then check the box (turn on) “Show touch keyboard button” in the context menu. 
A virtual keyboard icon should appear on the right side of the screen, clicking on which will launch the program.
How to use the virtual keyboard
The on-screen keyboard performs all the functions that are available to basic physical devices, including shift, ctrl, enter, alt, calling the OS context menu or enabling caps lock mode when entering texts...
Let's look at how this works. We launch the keyboard using one of the methods outlined, click on the button, for example, “shift” and we can type in capital letters. At the same time, we notice that the number buttons have changed to buttons for entering special characters. Depending on the selected layout, different specials will be shown. symbols.
Accordingly, to change the language, it is enough to press ctrl+shift or alt+shift in turn, that is, the key combination for changing the language.
composs.ru
Launching the on-screen keyboard in Windows 7

IN computer systems The Windows line has such an interesting tool as the on-screen keyboard. Let's see what options there are to launch it in Windows 7.
Launching the virtual keyboard
There may be several reasons to launch the on-screen or, as it is otherwise called, virtual keyboard:
- Failure of the physical analogue;
- Limited user capabilities (for example, problems with finger dexterity);
- Working on a tablet;
- To protect against keyloggers when entering passwords and other confidential data.
The user can choose whether to use the virtual keyboard built into Windows, or turn to similar products from third-party developers. But you can even launch the standard Windows on-screen keyboard different methods.
Method 1: Third Party Programs
First of all, let's focus on launching using third-party programs. In particular, let's look at one of the most famous applications this direction– Free Virtual Keyboard, we will study the nuances of its installation and launch. There are download options for this application in 8 languages, including Russian.
Download Free Virtual Keyboard


Method 2: Start Menu
But it is not at all necessary to install third-party programs. For many users, the functionality provided by the built-in Windows 7 tool, the On-Screen Keyboard, is quite sufficient. You can run it different ways. One of them is to use the same Start menu, which was discussed above.

Method 3: “Control Panel”
You can also access the On-Screen Keyboard through the Control Panel.

Method 4: Run window
You can also open the desired tool by entering an expression in the “Run” window.
- Open this window by pressing Win+R. Enter:
Click OK.
- On-Screen Keyboard is enabled.
Method 5: Search the Start Menu
You can also enable the tool discussed in this article by searching in the Start menu.
- Click “Start”. In the “Search programs and files” area, enter the following expression:
Screen keyboard
An element with the same name will appear in the search results in the “Programs” group. Click on it with LMB.
- The required tool will be launched.
Method 6: Directly Run the Executable File
The on-screen keyboard can be opened by directly launching the executable file by going to its location using Explorer.
- Launch Explorer. In its address bar, enter the address of the folder in which the On-Screen Keyboard executable file is located:
C:\windows\System32
Press Enter or click on the arrow-shaped icon to the right of the line.
- There is a transition to the directory where the file we need is located. Look for an item called "osk.exe". Since there are quite a lot of objects in the folder, in order to make searching easier, arrange them in alphabetical order by clicking on the name of the “Name” field. After locating the osk.exe file, double-click on it.
- The On-Screen Keyboard will launch.
Method 7: Launch from the address bar
You can also launch the on-screen keyboard by entering the address of the location of its executable file in the address field of Explorer.
- Open File Explorer. Enter in its address field:
C:\windows\System32\osk.exe
Press Enter or click the arrow to the right of the line.
- The tool is open.
Method 8: Create a shortcut
Convenient access to launching the On-Screen Keyboard can be organized by creating a corresponding shortcut on the desktop.

As you can see, there are quite a few ways to launch the On-Screen Keyboard built into Windows 7. Those users who are not satisfied with its functionality for some reason have the opportunity to install an analogue from a third-party developer.
We are glad that we were able to help you solve the problem.
Poll: did this article help you?
Not reallylumpics.ru
How to enable on-screen keyboard on windows 7/8/10
The keyboard that all users are used to working on may sooner or later fail. In such situations, especially when there is no time and money to buy a new model, and the assigned tasks need to be completed on time, the Windows on-screen keyboard can come to the rescue. In addition, in many situations its use may take precedence over a regular keyboard when it comes to user privacy. That is, it is safer to use for entering passwords and other sensitive information than a regular keyboard. In this topic, we will look at how to enable the on-screen keyboard on Windows 7, 8, 10 and how to set up its shortcut for quick launch.
Where is the on-screen keyboard located in different versions of Windows?
In fact, the directory for enabling the virtual keyboard in all mentioned windows versions is identical and it is called “Ease of Access Center”. The only difference is in the interface of the operating systems.
As already mentioned, the on-screen keyboard in Windows 7 and 8, that is, the option to turn it on, is located in the “Ease of Access Center” section. To enter it, you need to go to the “Start” menu and go to the “Control Panel” section.
To enable the on-screen keyboard in Windows 10, go to the Start menu in the same way and open the Settings item.
And in the next window the opportunity to call up the virtual keyboard appears.
Canal-IT.ru
Several ways to enable the Windows virtual keyboard
The Windows 7 virtual keyboard consists of keys that appear on top of the desktop or any other windows. In order for it to appear, it must be turned on, and to do this, perform a certain sequence of actions.

Why does the operating system include on-screen keyboard support?
Few people understand why Windows operating systems have a function to show the keyboard on the desktop. To understand this, you need to refer to the help and supplement it a little.
First of all, a virtual keyboard is required for those people whose fingers are inactive or absent. In addition, it can help if the keys on a regular keyboard suddenly stop working, and you urgently need to add text or type the name of the file recipient.
Recently, devices such as tablet computers have become very popular. Regular devices can be connected to them using bluetooth or wi-fi, but in the absence of wireless devices and USB sockets, work would be incredibly difficult if not for the virtual keyboard.
It can also help protect against malware called keyloggers. They read passwords that are entered from a physical keyboard and then send them to the attacker.
How to enable a virtual keyboard if there is a regular one?
- Method one. The latest versions of Windows OS conveniently implement search functions. Just click on the "Start" button and enter "on-screen keyboard" in the search bar. Now click on the top search link and the desired window will appear on the screen.
- The second method is more efficient. You just need to press the key combination windows + R, a window called “Run” will open. Write “osk” or “osk.exe” into it, and then click on the “OK” or “ENTER” button. If the window does not open after pressing the key combination, you will have to do a few extra steps. First, hover over the Start menu and right-click on it, select “Properties”. Find the “Settings” button on the right and click on it. After clicking, another window will open in which you need to check the box next to the words “Run”.
How to enable the virtual keyboard if the steps described above are done, but nothing works? Just open the "Start" menu, and in the right column select "Run", now you can easily enter the file name "osk" or "osk.exe"
How to enable the virtual keyboard if the regular one does not work?
The on-screen keyboard can only be opened using the mouse.

Click on "Start", then on "Control Panel" and select "Ease of Access".
A window called "Ease of Access Center" will open.
After clicking on "Enable virtual keyboard", the required keys will appear on top of all windows.
Open Explorer by double-clicking on the “My Computer” shortcut (it is advisable to perform this action as an Administrator).
Since it is not always possible to enable the virtual keyboard from the Control Panel, especially if the computer is infected, sometimes you need to open the executable file yourself.

Settings and additional features
The virtual keyboard is open on the screen, how can I enable its settings window? There is nothing complicated about this - click on the "Options" button. Here you can select a hover reaction by simply holding the mouse pointer over a certain key - it will be considered that this key is pressed.
Shutdown
Often, after some time of operation, the OS feature in the form of an on-screen keyboard becomes unnecessary. To disable a window that is no longer required for work, in its upper right corner, click on the buttons familiar to the user: the underscore symbol to minimize it, or the cross symbol to close it completely.
Today, there is probably not a person who does not use the Internet, does not go to social media or wouldn't have Mailbox, where information important to him is stored. However, all logins and passwords, as well as entering bank card numbers that allow you to pay for a particular product in online stores, are not safe using a regular keyboard that is connected to a computer via USB.
In order to protect your data from spyware, through which it falls into the hands of attackers, you need to use a virtual keyboard.
What is a virtual keyboard?
The virtual keyboard is a standard component of Windows operating systems. Its use is possible not only when entering confidential information, it will also become a convenient tool for people with disabilities and in cases where, for some reason, a regular keyboard has failed, and something urgently needs to be done on the computer.
The main purpose of the virtual keyboard is to protect confidential information from intruders. Under reliable protection There are users who work on a computer using the following web browsers:
- Mozilla Firefox 15.x – 17.x;
- Internet Explorer 8 – 10;
- GoogleChrome 9.x – 12.x.
- Of all the virtual keyboards existing today, the most popular are:
- ComfortOn-ScreenKeyboard 5040 (interface Russification is present, volume – 3.63 MB, OS – Windows 2000 and higher);
- FlorenceVirtualKeyboard 0.5.0 (no Russification of the interface, volume – 1.89 MB, OS – Linux);
- GreatisVirtualKeyboard 1.1 (Russian interface available, volume – 560 KB, OS – Windows 98/ME/XP);
- JitbitVirtualKeyboard 2.22 (Russian interface, volume – 539 KB, OS – Windows 2000 and higher);
- KeymanDesktop 8.0.3 (there is no Russification of the interface, volume – 7.65 MB, OS – Windows 2000 and higher);
- Klava 4.0 (there is no Russification of the interface, volume – 22 KB, OS – Windows 2000 and higher);
- Mountfocus 3.2 (there is no Russification of the interface, volume – 5.67 MB, OS – Windows 2000 and higher);
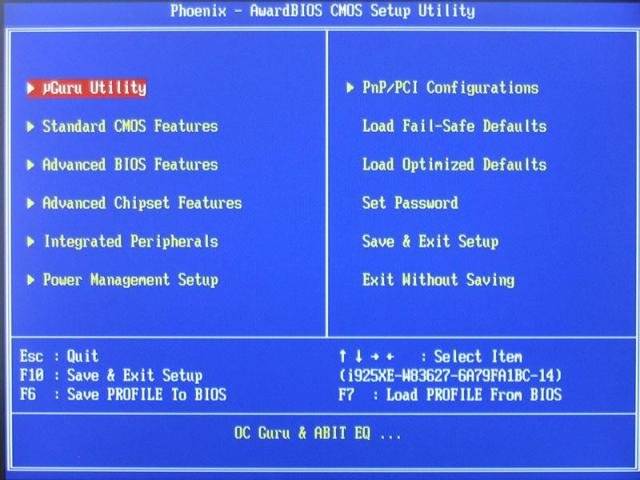
- find and enter the “Power Management Setup” section;

- in the window that appears, find the “Power On By PS2 KB/MS” section, assign it the value “Disabled” and indicate how to enable “Hot Key”;
- open “Hot Key Power On Ctrl-F1” and select one of the options for combinations of “hot keys” offered by the computer, when pressed in the future the computer will turn on;
- then you need to press the F10 key to save the changes;

- The “SAVE to CMOS and EXIT (Y/N)” window will appear, where you will need to enter the letter “Y” and press the “Enter” key.
- The reasons why a keyboard may break are divided into two types:
- software;
In the case when personal data is entered through a virtual keyboard when the site is hacked, the information will not be protected, since it directly goes to the scammers.
Switching methods
You can open the virtual keyboard in several ways:

Almost everyone knows how to enable a virtual keyboard from the keyboard. To do this, press the following keys simultaneously: CTRL + Alt + Shift + P.
Enabling the virtual keyboard through a web browser window is as follows: you need to open the browser window and click on the button in the toolbar with the mouse. You can enable the virtual keyboard directly through the context menu of the program sign by pressing right button

mouse on the program icon and select “Virtual keyboard” in the context menu.

You can launch the virtual keyboard in Windows 7 as follows:
Review of virtual programs - keyboards The virtual keyboard is a standard component of Windows operating systems. However, if for some reason you are not satisfied with it, such a keyboard can be easily downloaded on the Internet.
VirtualKeyboard 32.1.56 (there is no Russification of the interface, volume – 440 KB, OS – Windows 2000 and higher).
It happens that the system unit from the computer is located in a hard-to-reach place, for example, hiding it from small children or simply freeing up space in this way. And then many people ask the question “how to turn it on via a computer keyboard?”
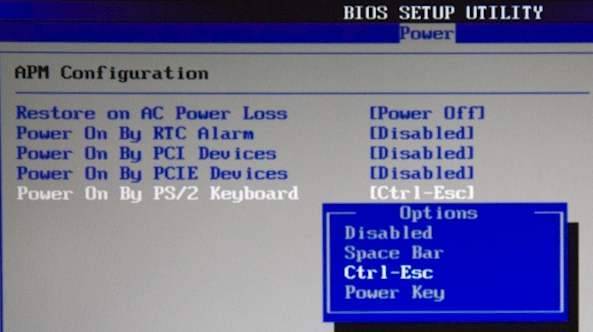
To start the computer without pressing the “Power” button located on the front case system unit, you need to make special settings in the BIOS that will allow you to turn on the PC via the keyboard.
To do this, you must continuously press the Del key when you turn on the computer. If suddenly this method does not help you enter the BIOS, then you can try pressing the Esc, F2 or F10 button. As a result, the BIOS interface will appear on your monitor screen, the menu of which must be navigated using the up/down, right/left arrows, and the Enter key is used to edit or select parameters.
So, in order to make settings in the BIOS, you need:
After the manipulations have been completed, the computer should reboot. That's all, now your computer will turn on using the key combination that you selected in BIOS settings. To turn off your PC using the keyboard:

There is another option to turn off the PC using the keyboard: the Alt + F4 key combination. Next, a window will appear in which you need to select the “shutdown” item and press the “Enter” key.
Well, if your keyboard is broken and your PC gives an error when you turn it on, then you will probably have the question “how to turn on the computer without a keyboard.” If you have the opportunity to borrow a keyboard from someone, then you need to go into the BIOS, find the “Set UP-ehalt” section and replace the value “on errors” with “no errors”. Thus, turning on the PC will occur without a keyboard.

The keyboard allows you not only to turn on/off the computer, but also to turn on/off the sound and adjust its volume.
How to turn on sound on a computer using the keyboard? Everything is very simple. To do this, press the F10 key and use the F11 and F12 keys to adjust the volume.
On-screen keyboard in operating systems
On-screen keyboard in operating rooms Windows systems 7 and Windows8 look different and some features may only be available on certain OSes.

Therefore, when downloading and installing the on-screen keyboard, you need to pay attention to the “supported OS” sub-item.
This is necessary not only for the on-screen keyboard to be successfully installed on the PC, but also in order to “fully” use its functions.
What to do - the keyboard does not work If the keyboard does not work, you need to determine the cause of its failure.
hardware.
If the cause of the breakdown is the hardware of the keyboard, it will be very problematic to correct the current situation without certain knowledge and skills. It's easier to replace the old keyboard with a new one. But first, check the cable through which the keyboard is connected to the PC. It may have come loose or become damaged. If the cable is intact and does not come out, try restarting the computer. Perhaps there was a malfunction during its operation. If restarting your PC was unsuccessful and the keyboard still does not work, try launching the Start panel with the mouse and going to Control Panel, and then to Hardware and Sound.
If there are problems with the keyboard, it will be marked in the system with a yellow color and an exclamation mark.
Using the mouse, select the keyboard and click “Delete”, and then close all tabs.